![]()
[ Download | Git repository | Matrix channel | Drone CI ]
Data resiliency for everyone
Garage is an open-source distributed storage service you can self-host to fullfill many needs:

⮞ learn more about use cases ⮜
Garage implements the Amazon S3 API and thus is already compatible with many applications:

⮞ learn more about integrations ⮜
Garage provides data resiliency by replicating data 3x over distant servers:

⮞ learn more about our design ⮜
Did you notice that this website is hosted and served by Garage?
Keeping requirements low
We worked hard to keep requirements as low as possible as we target the largest possible public.
- CPU: any x86_64 CPU from the last 10 years, ARMv7 or ARMv8.
- RAM: 1GB
- Disk Space: at least 16GB
- Network: 200ms or less, 50 Mbps or more
- Heterogeneous hardware: build a cluster with whatever second-hand machines are available
For the network, as we do not use consensus algorithms like Paxos or Raft, Garage is not as latency sensitive. Thanks to Rust and its zero-cost abstractions, we keep CPU and memory low.
Built on the shoulder of giants
- Dynamo: Amazon’s Highly Available Key-value Store by DeCandia et al.
- Conflict-Free Replicated Data Types by Shapiro et al.
- Maglev: A Fast and Reliable Software Network Load Balancer by Eisenbud et al.
Talks
-
(fr, 2021-11-13, video) Garage : Mille et une façons de stocker vos données and slides (html) - during RFID#1 event
-
(en, 2021-04-28, pdf) Distributed object storage is centralised
-
(fr, 2020-12-02, pdf) Garage : jouer dans la cour des grands quand on est un hébergeur associatif
Community
If you want to discuss with us, you can join our Matrix channel at #garage:deuxfleurs.fr. Our code repository and issue tracker, which is the place where you should report bugs, is managed on Deuxfleurs' Gitea.
License
Garage's source code, is released under the AGPL v3 License. Please note that if you patch Garage and then use it to provide any service over a network, you must share your code!
Sponsors and funding
The Deuxfleurs association has received a grant from NGI POINTER, to fund 3 people working on Garage full-time for a year: from October 2021 to September 2022.
This project has received funding from the European Union’s Horizon 2020 research and innovation programme within the framework of the NGI-POINTER Project funded under grant agreement N° 871528.
Quick Start
Let's start your Garage journey! In this chapter, we explain how to deploy Garage as a single-node server and how to interact with it.
Our goal is to introduce you to Garage's workflows. Following this guide is recommended before moving on to configuring a multi-node cluster.
Note that this kind of deployment should not be used in production, as it provides no redundancy for your data!
Get a binary
Download the latest Garage binary from the release pages on our repository:
https://garagehq.deuxfleurs.fr/_releases.html
Place this binary somewhere in your $PATH so that you can invoke the garage
command directly (for instance you can copy the binary in /usr/local/bin
or in ~/.local/bin).
If a binary of the last version is not available for your architecture, or if you want a build customized for your system, you can build Garage from source.
Writing a first configuration file
This first configuration file should allow you to get started easily with the simplest
possible Garage deployment.
Save it as /etc/garage.toml.
You can also store it somewhere else, but you will have to specify -c path/to/garage.toml
at each invocation of the garage binary (for example: garage -c ./garage.toml server, garage -c ./garage.toml status).
metadata_dir = "/tmp/meta"
data_dir = "/tmp/data"

replication_mode = "none"

rpc_bind_addr = "[::]:3901"
rpc_public_addr = "127.0.0.1:3901"
rpc_secret = "1799bccfd7411eddcf9ebd316bc1f5287ad12a68094e1c6ac6abde7e6feae1ec"

bootstrap_peers = []

[s3_api]
s3_region = "garage"
api_bind_addr = "[::]:3900"
root_domain = ".s3.garage"

[s3_web]
bind_addr = "[::]:3902"
root_domain = ".web.garage"
index = "index.html"
The rpc_secret value provided above is just an example. It will work, but in
order to secure your cluster you will need to use another one. You can generate
such a value with openssl rand -hex 32.
As you can see in the metadata_dir and data_dir parameters, we are saving Garage's data
in /tmp which gets erased when your system reboots. This means that data stored on this
Garage server will not be persistent. Change these to locations on your local disk if you want
your data to be persisted properly.
Launching the Garage server
Use the following command to launch the Garage server with our configuration file:
RUST_LOG=garage=info garage server
You can tune Garage's verbosity as follows (from less verbose to more verbose):
RUST_LOG=garage=info garage server
RUST_LOG=garage=debug garage server
RUST_LOG=garage=trace garage server
Log level info is recommended for most use cases.
Log level debug can help you check why your S3 API calls are not working.
Checking that Garage runs correctly
The garage utility is also used as a CLI tool to configure your Garage deployment.
It uses values from the TOML configuration file to find the Garage daemon running on the
local node, therefore if your configuration file is not at /etc/garage.toml you will
again have to specify -c path/to/garage.toml.
If the garage CLI is able to correctly detect the parameters of your local Garage node,
the following command should be enough to show the status of your cluster:
garage status
This should show something like this:
==== HEALTHY NODES ====
ID                 Hostname  Address         Tag                   Zone  Capacity
563e1ac825ee3323…  linuxbox  127.0.0.1:3901  NO ROLE ASSIGNED
Creating a cluster layout
Creating a cluster layout for a Garage deployment means informing Garage of the disk space available on each node of the cluster as well as the zone (e.g. datacenter) each machine is located in.
For our test deployment, we are using only one node. The way in which we configure it does not matter, you can simply write:
garage layout assign -z dc1 -c 1 <node_id>
where <node_id> corresponds to the identifier of the node shown by garage status (first column).
You can enter simply a prefix of that identifier.
For instance here you could write just garage layout assign -z dc1 -c 1 563e.
The layout then has to be applied to the cluster, using:
garage layout apply
Creating buckets and keys
In this section, we will suppose that we want to create a bucket named nextcloud-bucket
that will be accessed through a key named nextcloud-app-key.
Don't forget that help command and --help subcommands can help you anywhere,
the CLI tool is self-documented! Two examples:
garage help
garage bucket allow --help
Create a bucket
Let's take an example where we want to deploy NextCloud using Garage as the main data storage.
First, create a bucket with the following command:
garage bucket create nextcloud-bucket
Check that everything went well:
garage bucket list
garage bucket info nextcloud-bucket
Create an API key
The nextcloud-bucket bucket now exists on the Garage server,
however it cannot be accessed until we add an API key with the proper access rights.
Note that API keys are independent of buckets: one key can access multiple buckets, multiple keys can access one bucket.
Create an API key using the following command:
garage key new --name nextcloud-app-key
The output should look as follows:
Key name: nextcloud-app-key
Key ID: GK3515373e4c851ebaad366558
Secret key: 7d37d093435a41f2aab8f13c19ba067d9776c90215f56614adad6ece597dbb34
Authorized buckets:
Check that everything works as intended:
garage key list
garage key info nextcloud-app-key
Allow a key to access a bucket
Now that we have a bucket and a key, we need to give permissions to the key on the bucket:
garage bucket allow \
  --read \
  --write \
  nextcloud-bucket \
  --key nextcloud-app-key
You can check at any time the allowed keys on your bucket with:
garage bucket info nextcloud-bucket
Uploading and downlading from Garage
We recommend the use of MinIO Client to interact with Garage files (mc).
Instructions to install it and use it are provided on the
MinIO website.
Before reading the following, you need a working mc command on your path.
Note that on certain Linux distributions such as Arch Linux, the Minio client binary
is called mcli instead of mc (to avoid name clashes with the Midnight Commander).
Configure mc
You need your access key and secret key created above.
We will assume you are invoking mc on the same machine as the Garage server,
your S3 API endpoint is therefore http://127.0.0.1:3900.
For this whole configuration, you must set an alias name: we chose my-garage, that you will used for all commands.
Adapt the following command accordingly and run it:
mc alias set \
  my-garage \
  http://127.0.0.1:3900 \
  <access key> \
  <secret key> \
  --api S3v4
You must also add an environment variable to your configuration to
inform MinIO of our region (garage by default, corresponding to the s3_region parameter
in the configuration file).
The best way is to add the following snippet to your $HOME/.bash_profile
or $HOME/.bashrc file:
export MC_REGION=garage
Use mc
You can not list buckets from mc currently.
But the following commands and many more should work:
mc cp image.png my-garage/nextcloud-bucket
mc cp my-garage/nextcloud-bucket/image.png .
mc ls my-garage/nextcloud-bucket
mc mirror localdir/ my-garage/another-bucket
Other tools for interacting with Garage
The following tools can also be used to send and recieve files from/to Garage:
Refer to the "Integrations" section to learn how to configure application and command line utilities to integrate with Garage.
Cookbook
A cookbook, when you cook, is a collection of recipes. Similarly, Garage's cookbook contains a collection of recipes that are known to works well! This chapter could also be referred as "Tutorials" or "Best practices".
-
Multi-node deployment: This page will walk you through all of the necessary steps to deploy Garage in a real-world setting.
-
Building from source: This page explains how to build Garage from source in case a binary is not provided for your architecture, or if you want to hack with us!
-
Integration with Systemd: This page explains how to run Garage as a Systemd service (instead of as a Docker container).
-
Configuring a gateway node: This page explains how to run a gateway node in a Garage cluster, i.e. a Garage node that doesn't store data but accelerates access to data present on the other nodes.
-
Hosting a website: This page explains how to use Garage to host a static website.
-
Configuring a reverse-proxy: This page explains how to configure a reverse-proxy to add TLS support to your S3 api endpoint.
-
Recovering from failures: Garage's first selling point is resilience to hardware failures. This section explains how to recover from such a failure in the best possible way.
Deploying Garage on a real-world cluster
To run Garage in cluster mode, we recommend having at least 3 nodes. This will allow you to setup Garage for three-way replication of your data, the safest and most available mode proposed by Garage.
We recommend first following the quick start guide in order to get familiar with Garage's command line and usage patterns.
Prerequisites
To run a real-world deployment, make sure the following conditions are met:
-
You have at least three machines with sufficient storage space available.
-
Each machine has a public IP address which is reachable by other machines. Running behind a NAT is likely to be possible but hasn't been tested for the latest version (TODO).
-
Ideally, each machine should have a SSD available in addition to the HDD you are dedicating to Garage. This will allow for faster access to metadata and has the potential to drastically reduce Garage's response times.
-
This guide will assume you are using Docker containers to deploy Garage on each node. Garage can also be run independently, for instance as a Systemd service. You can also use an orchestrator such as Nomad or Kubernetes to automatically manage Docker containers on a fleet of nodes.
Before deploying Garage on your infrastructure, you must inventory your machines. For our example, we will suppose the following infrastructure with IPv6 connectivity:
| Location | Name | IP Address | Disk Space |
|---|---|---|---|
| Paris | Mercury | fc00:1::1 | 1 To |
| Paris | Venus | fc00:1::2 | 2 To |
| London | Earth | fc00:B::1 | 2 To |
| Brussels | Mars | fc00:F::1 | 1.5 To |
Get a Docker image
Our docker image is currently named dxflrs/amd64_garage and is stored on the Docker Hub.
We encourage you to use a fixed tag (eg. v0.4.0) and not the latest tag.
For this example, we will use the latest published version at the time of the writing which is v0.4.0 but it's up to you
to check the most recent versions on the Docker Hub.
For example:
sudo docker pull dxflrs/amd64_garage:v0.4.0
Deploying and configuring Garage
On each machine, we will have a similar setup, especially you must consider the following folders/files:
-
/etc/garage.toml: Garage daemon's configuration (see below) -
/var/lib/garage/meta/: Folder containing Garage's metadata, put this folder on a SSD if possible -
/var/lib/garage/data/: Folder containing Garage's data, this folder will be your main data storage and must be on a large storage (e.g. large HDD)
A valid /etc/garage/garage.toml for our cluster would look as follows:
metadata_dir = "/var/lib/garage/meta"
data_dir = "/var/lib/garage/data"

replication_mode = "3"

compression_level = 2

rpc_bind_addr = "[::]:3901"
rpc_public_addr = "<this node's public IP>:3901"
rpc_secret = "<RPC secret>"

bootstrap_peers = []

[s3_api]
s3_region = "garage"
api_bind_addr = "[::]:3900"
root_domain = ".s3.garage"

[s3_web]
bind_addr = "[::]:3902"
root_domain = ".web.garage"
index = "index.html"
Check the following for your configuration files:
-
Make sure
rpc_public_addrcontains the public IP address of the node you are configuring. This parameter is optional but recommended: if your nodes have trouble communicating with one another, consider adding it. -
Make sure
rpc_secretis the same value on all nodes. It should be a 32-bytes hex-encoded secret key. You can generate such a key withopenssl rand -hex 32.
Starting Garage using Docker
On each machine, you can run the daemon with:
docker run \
  -d \
  --name garaged \
  --restart always \
  --network host \
  -v /etc/garage.toml:/etc/garage.toml \
  -v /var/lib/garage/meta:/var/lib/garage/meta \
  -v /var/lib/garage/data:/var/lib/garage/data \
  lxpz/garage_amd64:v0.4.0
It should be restarted automatically at each reboot. Please note that we use host networking as otherwise Docker containers can not communicate with IPv6.
Upgrading between Garage versions should be supported transparently, but please check the relase notes before doing so! To upgrade, simply stop and remove this container and start again the command with a new version of Garage.
Controling the daemon
The garage binary has two purposes:
- it acts as a daemon when launched with
garage server - it acts as a control tool for the daemon when launched with any other command
Ensure an appropriate garage binary (the same version as your Docker image) is available in your path.
If your configuration file is at /etc/garage.toml, the garage binary should work with no further change.
You can test your garage CLI utility by running a simple command such as:
garage status
At this point, nodes are not yet talking to one another. Your output should therefore look like follows:
Mercury$ garage status
==== HEALTHY NODES ====
ID                  Hostname  Address           Tag                   Zone  Capacity
563e1ac825ee3323…   Mercury   [fc00:1::1]:3901  NO ROLE ASSIGNED
Connecting nodes together
When your Garage nodes first start, they will generate a local node identifier (based on a public/private key pair).
To obtain the node identifier of a node, once it is generated,
run garage node id.
This will print keys as follows:
Mercury$ garage node id
563e1ac825ee3323aa441e72c26d1030d6d4414aeb3dd25287c531e7fc2bc95d@[fc00:1::1]:3901

Venus$ garage node id
86f0f26ae4afbd59aaf9cfb059eefac844951efd5b8caeec0d53f4ed6c85f332@[fc00:1::2]:3901

etc.
You can then instruct nodes to connect to one another as follows:
# Instruct Venus to connect to Mercury (this will establish communication both ways)
Venus$ garage node connect 563e1ac825ee3323aa441e72c26d1030d6d4414aeb3dd25287c531e7fc2bc95d@[fc00:1::1]:3901
You don't nead to instruct all node to connect to all other nodes: nodes will discover one another transitively.
Now if your run garage status on any node, you should have an output that looks as follows:
==== HEALTHY NODES ====
ID                  Hostname  Address           Tag                   Zone  Capacity
563e1ac825ee3323…   Mercury   [fc00:1::1]:3901  NO ROLE ASSIGNED
86f0f26ae4afbd59…   Venus     [fc00:1::2]:3901  NO ROLE ASSIGNED
68143d720f20c89d…   Earth     [fc00:B::1]:3901  NO ROLE ASSIGNED
212f7572f0c89da9…   Mars      [fc00:F::1]:3901  NO ROLE ASSIGNED
Creating a cluster layout
We will now inform Garage of the disk space available on each node of the cluster as well as the zone (e.g. datacenter) in which each machine is located. This information is called the cluster layout and consists of a role that is assigned to each active cluster node.
For our example, we will suppose we have the following infrastructure (Capacity, Identifier and Zone are specific values to Garage described in the following):
| Location | Name | Disk Space | Capacity | Identifier | Zone |
|---|---|---|---|---|---|
| Paris | Mercury | 1 To | 10 | 563e | par1 |
| Paris | Venus | 2 To | 20 | 86f0 | par1 |
| London | Earth | 2 To | 20 | 6814 | lon1 |
| Brussels | Mars | 1.5 To | 15 | 212f | bru1 |
Node identifiers
After its first launch, Garage generates a random and unique identifier for each nodes, such as:
563e1ac825ee3323aa441e72c26d1030d6d4414aeb3dd25287c531e7fc2bc95d
Often a shorter form can be used, containing only the beginning of the identifier, like 563e,
which identifies the server "Mercury" located in "Paris" according to our previous table.
The most simple way to match an identifier to a node is to run:
garage status
It will display the IP address associated with each node; from the IP address you will be able to recognize the node.
Zones
Zones are simply a user-chosen identifier that identify a group of server that are grouped together logically. It is up to the system administrator deploying Garage to identify what does "grouped together" means.
In most cases, a zone will correspond to a geographical location (i.e. a datacenter). Behind the scene, Garage will use zone definition to try to store the same data on different zones, in order to provide high availability despite failure of a zone.
Capacity
Garage reasons on an abstract metric about disk storage that is named the capacity of a node. The capacity configured in Garage must be proportional to the disk space dedicated to the node.
Capacity values must be integers but can be given any signification. Here we chose that 1 unit of capacity = 100 GB.
Note that the amount of data stored by Garage on each server may not be strictly proportional to its capacity value, as Garage will priorize having 3 copies of data in different zones, even if this means that capacities will not be strictly respected. For example in our above examples, nodes Earth and Mars will always store a copy of everything each, and the third copy will have 66% chance of being stored by Venus and 33% chance of being stored by Mercury.
Injecting the topology
Given the information above, we will configure our cluster as follow:
garage layout assign -z par1 -c 10 -t mercury 563e
garage layout assign -z par1 -c 20 -t venus 86f0
garage layout assign -z lon1 -c 20 -t earth 6814
garage layout assign -z bru1 -c 15 -t mars 212f
At this point, the changes in the cluster layout have not yet been applied. To show the new layout that will be applied, call:
garage layout show
Once you are satisfied with your new layout, apply it with:
garage layout apply
WARNING: if you want to use the layout modification commands in a script, make sure to read this page first.
Using your Garage cluster
Creating buckets and managing keys is done using the garage CLI,
and is covered in the quick start guide.
Remember also that the CLI is self-documented thanks to the --help flag and
the help subcommand (e.g. garage help, garage key --help).
Configuring S3-compatible applicatiosn to interact with Garage is covered in the Integrations section.
Compiling Garage from source
Garage is a standard Rust project.
First, you need rust and cargo.
For instance on Debian:
sudo apt-get update
sudo apt-get install -y rustc cargo
You can also use Rustup to setup a Rust toolchain easily.
Using source from crates.io
Garage's source code is published on crates.io, Rust's official package repository.
This means you can simply ask cargo to download and build this source code for you:
cargo install garage
That's all, garage should be in $HOME/.cargo/bin.
You can add this folder to your $PATH or copy the binary somewhere else on your system.
For instance:
sudo cp $HOME/.cargo/bin/garage /usr/local/bin/garage
Using source from the Gitea repository
The primary location for Garage's source code is the Gitea repository.
Clone the repository and build Garage with the following commands:
git clone https://git.deuxfleurs.fr/Deuxfleurs/garage.git
cd garage
cargo build
Be careful, as this will make a debug build of Garage, which will be extremely slow!
To make a release build, invoke cargo build --release (this takes much longer).
The binaries built this way are found in target/{debug,release}/garage.
Starting Garage with systemd
We make some assumptions for this systemd deployment.
-
Your garage binary is located at
/usr/local/bin/garage. -
Your configuration file is located at
/etc/garage.toml. -
Your
garage.tomlmust be set withmetadata_dir=/var/lib/garage/metaanddata_dir=/var/lib/garage/data. This is mandatory to usesystemdhardening feature Dynamic User. Note that in your host filesystem, Garage data will be held in/var/lib/private/garage.
Create a file named /etc/systemd/system/garage.service:
[Unit]
Description=Garage Data Store
After=network-online.target
Wants=network-online.target

[Service]
Environment='RUST_LOG=garage=info' 'RUST_BACKTRACE=1'
ExecStart=/usr/local/bin/garage server
StateDirectory=garage
DynamicUser=true
ProtectHome=true
NoNewPrivileges=true

[Install]
WantedBy=multi-user.target
A note on hardening: garage will be run as a non privileged user, its user id is dynamically allocated by systemd. It cannot access (read or write) home folders (/home, /root and /run/user), the rest of the filesystem can only be read but not written, only the path seen as /var/lib/garage is writable as seen by the service (mapped to /var/lib/private/garage on your host). Additionnaly, the process can not gain new privileges over time.
To start the service then automatically enable it at boot:
sudo systemctl start garage
sudo systemctl enable garage
To see if the service is running and to browse its logs:
sudo systemctl status garage
sudo journalctl -u garage
If you want to modify the service file, do not forget to run systemctl daemon-reload
to inform systemd of your modifications.
Gateways
Gateways allow you to expose Garage endpoints (S3 API and websites) without storing data on the node.
Benefits
You can configure Garage as a gateway on all nodes that will consume your S3 API, it will provide you the following benefits:
-
It removes 1 or 2 network RTT. Instead of (querying your reverse proxy then) querying a random node of the cluster that will forward your request to the nodes effectively storing the data, your local gateway will directly knows which node to query.
-
It eases server management. Instead of tracking in your reverse proxy and DNS what are the current Garage nodes, your gateway being part of the cluster keeps this information for you. In your software, you will always specify
http://localhost:3900. -
It simplifies security. Instead of having to maintain and renew a TLS certificate, you leverage the Secret Handshake protocol we use for our cluster. The S3 API protocol will be in plain text but limited to your local machine.
Limitations
Currently it will not work with minio client. Follow issue #64 for more information.
Spawn a Gateway
The instructions are similar to a regular node, the only option that is different is while configuring the node, you must set the --gateway parameter:
garage layout assign --gateway --tag gw1 <node_id>
garage layout show    # review the changes you are making
garage layout apply   # once satisfied, apply the changes
Then use http://localhost:3900 when a S3 endpoint is required:
aws --endpoint-url http://127.0.0.1:3900 s3 ls
If a newly added gateway node seems to not be working, do a full table resync to ensure that bucket and key list are correctly propagated:
garage repair -a --yes tables
Exposing buckets as websites
You can expose your bucket as a website with this simple command:
garage bucket website --allow my-website
Now it will be publicly exposed on the web endpoint (by default listening on port 3902).
Our website serving logic is as follow:
- Supports only static websites (no support for PHP or other languages)
- Does not support directory listing
- The index is defined in your
garage.toml. (ref)
Now we need to infer the URL of your website through your bucket name. Let assume:
- we set
root_domain = ".web.example.com"ingarage.toml(ref) - our bucket name is
garagehq.deuxfleurs.fr.
Our bucket will be served if the Host field matches one of these 2 values (the port is ignored):
-
garagehq.deuxfleurs.fr.web.example.com: you can dedicate a subdomain to your users (hereweb.example.com). -
garagehq.deuxfleurs.fr: your users can bring their own domain name, they just need to point them to your Garage cluster.
You can try this logic locally, without configuring any DNS, thanks to curl:
# prepare your test
echo hello world > /tmp/index.html
mc cp /tmp/index.html garage/garagehq.deuxfleurs.fr

curl -H 'Host: garagehq.deuxfleurs.fr' http://localhost:3902
# should print "hello world"

curl -H 'Host: garagehq.deuxfleurs.fr.web.example.com' http://localhost:3902
# should also print "hello world"
Now that you understand how website logic works on Garage, you can:
- make the website endpoint listens on port 80 (instead of 3902)
- use iptables to redirect the port 80 to the port 3902:
iptables -t nat -A PREROUTING -p tcp -dport 80 -j REDIRECT -to-port 3902 - or configure a reverse proxy in front of Garage to add TLS (HTTPS), CORS support, etc.
You can also take a look at Website Integration to see how you can add Garage to your workflow.
Configuring a reverse proxy
The main reason to add a reverse proxy in front of Garage is to provide TLS to your users.
In production you will likely need your certificates signed by a certificate authority. The most automated way is to use a provider supporting the ACME protocol such as Let's Encrypt, ZeroSSL or Buypass Go SSL.
If you are only testing Garage, you can generate a self-signed certificate to follow the documentation:
openssl req \
    -new \
    -x509 \
    -keyout /tmp/garage.key \
    -out /tmp/garage.crt \
    -nodes  \
    -subj "/C=XX/ST=XX/L=XX/O=XX/OU=XX/CN=localhost/emailAddress=X@X.XX" \
    -addext "subjectAltName = DNS:localhost, IP:127.0.0.1"

cat /tmp/garage.key /tmp/garage.crt > /tmp/garage.pem
Be careful as you will need to allow self signed certificates in your client.
For example, with minio, you must add the --insecure flag.
An example:
mc ls --insecure garage/
socat (only for testing purposes)
If you want to test Garage with a TLS frontend, socat can do it for you in a single command:
socat \
"openssl-listen:443,\
reuseaddr,\
fork,\
verify=0,\
cert=/tmp/garage.pem" \
tcp4-connect:localhost:3900
Nginx
Nginx is a well-known reverse proxy suitable for production. We do the configuration in 3 steps: first we define the upstream blocks ("the backends") then we define the server blocks ("the frontends") for the S3 endpoint and finally for the web endpoint.
The following configuration blocks can be all put in the same /etc/nginx/sites-available/garage.conf.
To make your configuration active, run ln -s /etc/nginx/sites-available/garage.conf /etc/nginx/sites-enabled/.
If you directly put the instructions in the root nginx.conf, keep in mind that these configurations must be enclosed inside a http { } block.
And do not forget to reload nginx with systemctl reload nginx or nginx -s reload.
Defining backends
First, we need to tell to nginx how to access our Garage cluster. Because we have multiple nodes, we want to leverage all of them by spreading the load.
In nginx, we can do that with the upstream directive.
Because we have 2 endpoints: one for the S3 API and one to serve websites,
we create 2 backends named respectively s3_backend and web_backend.
A documented example for the s3_backend assuming you chose port 3900:
upstream s3_backend {
  # if you have a garage instance locally
  server 127.0.0.1:3900;
  # you can also put your other instances
  server 192.168.1.3:3900;
  # domain names also work
  server garage1.example.com:3900;
  # you can assign weights if you have some servers
  # that are more powerful than others
  server garage2.example.com:3900 weight=2;
}
A similar example for the web_backend assuming you chose port 3902:
upstream web_backend {
  server 127.0.0.1:3902;
  server 192.168.1.3:3902;
  server garage1.example.com:3902;
  server garage2.example.com:3902 weight=2;
}
Exposing the S3 API
The configuration section for the S3 API is simple as we only support path-access style yet. We simply configure the TLS parameters and forward all the requests to the backend:
server {
  listen [::]:443 http2 ssl;
  ssl_certificate     /tmp/garage.crt;
  ssl_certificate_key /tmp/garage.key;

  # should be the endpoint you want
  # aws uses s3.amazonaws.com for example
  server_name garage.example.com;

  location / {
    proxy_pass http://s3_backend;
    proxy_set_header X-Forwarded-For $proxy_add_x_forwarded_for;
    proxy_set_header Host $host;
  }
}
Exposing the web endpoint
The web endpoint is a bit more complicated to configure as it listens on many different Host fields.
To better understand the logic involved, you can refer to the Exposing buckets as websites section.
Also, for some applications, you may need to serve CORS headers: Garage can not serve them directly but we show how we can use nginx to serve them.
You can use the following example as your starting point:
server {
  listen [::]:443 http2 ssl;
  ssl_certificate     /tmp/garage.crt;
  ssl_certificate_key /tmp/garage.key;

  # We list all the Hosts fields that can access our buckets
  server_name *.web.garage
              example.com
              my-site.tld
              ;

  location / {
    # Add these headers only if you want to allow CORS requests
    # For production use, more specific rules would be better for your security
    add_header Access-Control-Allow-Origin *;
    add_header Access-Control-Max-Age 3600;
    add_header Access-Control-Expose-Headers Content-Length;
    add_header Access-Control-Allow-Headers Range;

    # We do not forward OPTIONS requests to Garage
    # as it does not support them but they are needed for CORS.
    if ($request_method = OPTIONS) {
      return 200;
    }

    proxy_pass http://web_backend;
    proxy_set_header X-Forwarded-For $proxy_add_x_forwarded_for;
    proxy_set_header Host $host;
  }
}
Apache httpd
@TODO
Traefik
@TODO
Recovering from failures
Garage is meant to work on old, second-hand hardware. In particular, this makes it likely that some of your drives will fail, and some manual intervention will be needed. Fear not! For Garage is fully equipped to handle drive failures, in most common cases.
A note on availability of Garage
With nodes dispersed in 3 zones or more, here are the guarantees Garage provides with the 3-way replication strategy (3 copies of all data, which is the recommended replication mode):
- The cluster remains fully functional as long as the machines that fail are in only one zone. This includes a whole zone going down due to power/Internet outage.
- No data is lost as long as the machines that fail are in at most two zones.
Of course this only works if your Garage nodes are correctly configured to be aware of the zone in which they are located.
Make sure this is the case using garage status to check on the state of your cluster's configuration.
In case of temporarily disconnected nodes, Garage should automatically re-synchronize when the nodes come back up. This guide will deal with recovering from disk failures that caused the loss of the data of a node.
First option: removing a node
If you don't have spare parts (HDD, SDD) to replace the failed component, and if there are enough remaining nodes in your cluster (at least 3), you can simply remove the failed node from Garage's configuration. Note that if you do intend to replace the failed parts by new ones, using this method followed by adding back the node is not recommended (although it should work), and you should instead use one of the methods detailed in the next sections.
Removing a node is done with the following command:
garage layout remove <node_id>
garage layout show    # review the changes you are making
garage layout apply   # once satisfied, apply the changes
(you can get the node_id of the failed node by running garage status)
This will repartition the data and ensure that 3 copies of everything are present on the nodes that remain available.
Replacement scenario 1: only data is lost, metadata is fine
The recommended deployment for Garage uses an SSD to store metadata, and an HDD to store blocks of data. In the case where only a single HDD crashes, the blocks of data are lost but the metadata is still fine.
This is very easy to recover by setting up a new HDD to replace the failed one. The node does not need to be fully replaced and the configuration doesn't need to change. We just need to tell Garage to get back all the data blocks and store them on the new HDD.
First, set up a new HDD to store Garage's data directory on the failed node, and restart Garage using the existing configuration. Then, run:
garage repair -a --yes blocks
This will re-synchronize blocks of data that are missing to the new HDD, reading them from copies located on other nodes.
You can check on the advancement of this process by doing the following command:
garage stats -a
Look out for the following output:
Block manager stats:
  resync queue length: 26541
This indicates that one of the Garage node is in the process of retrieving missing data from other nodes. This number decreases to zero when the node is fully synchronized.
Replacement scenario 2: metadata (and possibly data) is lost
This scenario covers the case where a full node fails, i.e. both the metadata directory and the data directory are lost, as well as the case where only the metadata directory is lost.
To replace the lost node, we will start from an empty metadata directory, which means Garage will generate a new node ID for the replacement node. We will thus need to remove the previous node ID from Garage's configuration and replace it by the ID of the new node.
If your data directory is stored on a separate drive and is still fine, you can keep it, but it is not necessary to do so. In all cases, the data will be rebalanced and the replacement node will not store the same pieces of data as were originally stored on the one that failed. So if you keep the data files, the rebalancing might be faster but most of the pieces will be deleted anyway from the disk and replaced by other ones.
First, set up a new drive to store the metadata directory for the replacement node (a SSD is recommended),
and for the data directory if necessary. You can then start Garage on the new node.
The restarted node should generate a new node ID, and it should be shown as NOT CONFIGURED in garage status.
The ID of the lost node should be shown in garage status in the section for disconnected/unavailable nodes.
Then, replace the broken node by the new one, using:
garage layout assign <new_node_id> --replace <old_node_id> \
		-c <capacity> -z <zone> -t <node_tag>
garage layout show    # review the changes you are making
garage layout apply   # once satisfied, apply the changes
Garage will then start synchronizing all required data on the new node.
This process can be monitored using the garage stats -a command.
Integrations
Garage implements the Amazon S3 protocol, which makes it compatible with many existing software programs.
In particular, you will find here instructions to connect it with:
Generic instructions
To configure S3-compatible software to interact with Garage, you will need the following parameters:
-
An API endpoint: this corresponds to the HTTP or HTTPS address used to contact the Garage server. When runing Garage locally this will usually be
http://127.0.0.1:3900. In a real-world setting, you would usually have a reverse-proxy that adds TLS support and makes your Garage server available under a public hostname such ashttps://garage.example.com. -
An API access key and its associated secret key. These usually look something like this:
GK3515373e4c851ebaad366558(access key),7d37d093435a41f2aab8f13c19ba067d9776c90215f56614adad6ece597dbb34(secret key). These keys are created and managed using thegarageCLI, as explained in the quick start guide.
Most S3 clients can be configured easily with these parameters, provided that you follow the following guidelines:
-
Force path style: Garage does not support DNS-style buckets, which are now by default on Amazon S3. Instead, Garage uses the legacy path-style bucket addressing. Remember to configure your client to acknowledge this fact.
-
Configuring the S3 region: Garage requires your client to talk to the correct "S3 region", which is set in the configuration file. This is often set just to
garage. If this is not configured explicitly, clients usually try to talk to regionus-east-1. Garage should normally redirect your client to the correct region, but in case your client does not support this you might have to configure it manually.
Apps (Nextcloud, Peertube...)
In this section, we cover the following software: Nextcloud, Peertube, Mastodon, Matrix
Nextcloud
Nextcloud is a popular file synchronisation and backup service. By default, Nextcloud stores its data on the local filesystem. If you want to expand your storage to aggregate multiple servers, Garage is the way to go.
A S3 backend can be configured in two ways on Nextcloud, either as Primary Storage or as an External Storage. Primary storage will store all your data on S3, in an opaque manner, and will provide the best performances. External storage enable you to select which data will be stored on S3, your file hierarchy will be preserved in S3, but it might be slower.
In the following, we cover both methods but before reading our guide, we suppose you have done some preliminary steps. First, we expect you have an already installed and configured Nextcloud instance. Second, we suppose you have created a key and a bucket.
As a reminder, you can create a key for your nextcloud instance as follow:
garage key new --name nextcloud-key
Keep the Key ID and the Secret key in a pad, they will be needed later.
Then you can create a bucket and give read/write rights to your key on this bucket with:
garage bucket create nextcloud
garage bucket allow nextcloud --read --write --key nextcloud-key
Primary Storage
Now edit your Nextcloud configuration file to enable object storage.
On my installation, the config. file is located at the following path: /var/www/nextcloud/config/config.php.
We will add a new root key to the $CONFIG dictionnary named objectstore:
<?php
$CONFIG = array(
/* your existing configuration */
'objectstore' => [
    'class' => '\\OC\\Files\\ObjectStore\\S3',
    'arguments' => [
        'bucket' => 'nextcloud',   // Your bucket name, must be created before
        'autocreate' => false,     // Garage does not support autocreate
        'key'    => 'xxxxxxxxx',   // The Key ID generated previously
        'secret' => 'xxxxxxxxx',   // The Secret key generated previously
        'hostname' => '127.0.0.1', // Can also be a domain name, eg. garage.example.com
        'port' => 3900,            // Put your reverse proxy port or your S3 API port
        'use_ssl' => false,        // Set it to true if you have a TLS enabled reverse proxy
        'region' => 'garage',      // Garage has only one region named "garage"
        'use_path_style' => true   // Garage supports only path style, must be set to true
    ],
],
That's all, your Nextcloud will store all your data to S3. To test your new configuration, just reload your Nextcloud webpage and start sending data.
External link: Nextcloud Documentation > Primary Storage
External Storage
From the GUI. Activate the "External storage support" app from the "Applications" page (click on your account icon on the top right corner of your screen to display the menu). Go to your parameters page (also located below your account icon). Click on external storage (or the corresponding translation in your language).
 Click on the picture to zoom
Add a new external storage. Put what you want in "folder name" (eg. "shared"). Select "Amazon S3". Keep "Access Key" for the Authentication field. In Configuration, put your bucket name (eg. nextcloud), the host (eg. 127.0.0.1), the port (eg. 3900 or 443), the region (garage). Tick the SSL box if you have put an HTTPS proxy in front of garage. You must tick the "Path access" box and you must leave the "Legacy authentication (v2)" box empty. Put your Key ID (eg. GK...) and your Secret Key in the last two input boxes. Finally click on the tick symbol on the right of your screen.
Now go to your "Files" app and a new "linked folder" has appeared with the name you chose earlier (eg. "shared").
External link: Nextcloud Documentation > External Storage Configuration GUI
From the CLI. First install the external storage application:
php occ app:install files_external
Then add a new mount point with:
 php occ files_external:create \
  -c bucket=nextcloud \
  -c hostname=127.0.0.1 \
  -c port=3900 \
  -c region=garage \
  -c use_ssl=false \
  -c use_path_style=true \
  -c legacy_auth=false \
  -c key=GKxxxx \
  -c secret=xxxx \
  shared amazons3 amazons3::accesskey
Adapt the hostname, port, use_ssl, key, and secret entries to your configuration.
Do not change the use_path_style and legacy_auth entries, other configurations are not supported.
External link: Nextcloud Documentation > occ command > files external
Peertube
Peertube proposes a clever integration of S3 by directly exposing its endpoint instead of proxifying requests through the application. In other words, Peertube is only responsible of the "control plane" and offload the "data plane" to Garage. In return, this system is a bit harder to configure, especially with Garage that supports less feature than other older S3 backends. We show that it is still possible to configure Garage with Peertube, allowing you to spread the load and the bandwidth usage on the Garage cluster.
Enable path-style access by patching Peertube
First, you will need to apply a small patch on Peertube (#4510):
From e3b4c641bdf67e07d406a1d49d6aa6b1fbce2ab4 Mon Sep 17 00:00:00 2001
From: Martin Honermeyer <maze@strahlungsfrei.de>
Date: Sun, 31 Oct 2021 12:34:04 +0100
Subject: [PATCH] Allow setting path-style access for object storage

---
 config/default.yaml                                           | 4 ++++
 config/production.yaml.example                                | 4 ++++
 server/initializers/config.ts                                 | 1 +
 server/lib/object-storage/shared/client.ts                    | 3 ++-
 .../production/config/custom-environment-variables.yaml       | 2 ++
 5 files changed, 13 insertions(+), 1 deletion(-)

diff --git a/config/default.yaml b/config/default.yaml
index cf9d69a6211..4efd56fb804 100644
--- a/config/default.yaml
+++ b/config/default.yaml
@@ -123,6 +123,10 @@ object_storage:
     # You can also use AWS_SECRET_ACCESS_KEY env variable
     secret_access_key: ''

+  # Reference buckets via path rather than subdomain
+  # (i.e. "my-endpoint.com/bucket" instead of "bucket.my-endpoint.com")
+  force_path_style: false
+
   # Maximum amount to upload in one request to object storage
   max_upload_part: 2GB

diff --git a/config/production.yaml.example b/config/production.yaml.example
index 70993bf57a3..9ca2de5f4c9 100644
--- a/config/production.yaml.example
+++ b/config/production.yaml.example
@@ -121,6 +121,10 @@ object_storage:
     # You can also use AWS_SECRET_ACCESS_KEY env variable
     secret_access_key: ''

+  # Reference buckets via path rather than subdomain
+  # (i.e. "my-endpoint.com/bucket" instead of "bucket.my-endpoint.com")
+  force_path_style: false
+
   # Maximum amount to upload in one request to object storage
   max_upload_part: 2GB

diff --git a/server/initializers/config.ts b/server/initializers/config.ts
index 8375bf4304c..d726c59a4b6 100644
--- a/server/initializers/config.ts
+++ b/server/initializers/config.ts
@@ -91,6 +91,7 @@ const CONFIG = {
       ACCESS_KEY_ID: config.get<string>('object_storage.credentials.access_key_id'),
       SECRET_ACCESS_KEY: config.get<string>('object_storage.credentials.secret_access_key')
     },
+    FORCE_PATH_STYLE: config.get<boolean>('object_storage.force_path_style'),
     VIDEOS: {
       BUCKET_NAME: config.get<string>('object_storage.videos.bucket_name'),
       PREFIX: config.get<string>('object_storage.videos.prefix'),
diff --git a/server/lib/object-storage/shared/client.ts b/server/lib/object-storage/shared/client.ts
index c9a61459336..eadad02f93f 100644
--- a/server/lib/object-storage/shared/client.ts
+++ b/server/lib/object-storage/shared/client.ts
@@ -26,7 +26,8 @@ function getClient () {
         accessKeyId: OBJECT_STORAGE.CREDENTIALS.ACCESS_KEY_ID,
         secretAccessKey: OBJECT_STORAGE.CREDENTIALS.SECRET_ACCESS_KEY
       }
-      : undefined
+      : undefined,
+    forcePathStyle: CONFIG.OBJECT_STORAGE.FORCE_PATH_STYLE
   })

   logger.info('Initialized S3 client %s with region %s.', getEndpoint(), OBJECT_STORAGE.REGION, lTags())
diff --git a/support/docker/production/config/custom-environment-variables.yaml b/support/docker/production/config/custom-environment-variables.yaml
index c7cd28e6521..a960bab0bc9 100644
--- a/support/docker/production/config/custom-environment-variables.yaml
+++ b/support/docker/production/config/custom-environment-variables.yaml
@@ -54,6 +54,8 @@ object_storage:

   region: "PEERTUBE_OBJECT_STORAGE_REGION"

+  force_path_style: "PEERTUBE_OBJECT_STORAGE_FORCE_PATH_STYLE"
+
   max_upload_part:
     __name: "PEERTUBE_OBJECT_STORAGE_MAX_UPLOAD_PART"
     __format: "json"
You can then recompile it with:
npm run build
And it can be started with:
NODE_ENV=production NODE_CONFIG_DIR=/srv/peertube/config node dist/server.js
Create resources in Garage
Create a key for Peertube:
garage key new --name peertube-key
Keep the Key ID and the Secret key in a pad, they will be needed later.
We need two buckets, one for normal videos (named peertube-video) and one for webtorrent videos (named peertube-playlist).
garage bucket create peertube-video
garage bucket create peertube-playlist
Now we allow our key to read and write on these buckets:
garage bucket allow peertube-playlist --read --write --key peertube-key
garage bucket allow peertube-video --read --write --key peertube-key
Finally, we need to expose these buckets publicly to serve their content to users:
garage bucket website --allow peertube-playlist
garage bucket website --allow peertube-video
These buckets are now accessible on the web port (by default 3902) with the following URL: http://<bucket><root_domain>:<web_port> where the root domain is defined in your configuration file (by default .web.garage). So we have currently the following URLs:
- http://peertube-playlist.web.garage:3902
- http://peertube-video.web.garage:3902
Make sure you (will) have a corresponding DNS entry for them.
Configure a Reverse Proxy to serve CORS
Now we will configure a reverse proxy in front of Garage. This is required as we have no other way to serve CORS headers yet. Check the Configuring a reverse proxy section to know how.
Now make sure that your 2 dns entries are pointing to your reverse proxy.
Configure Peertube
You must edit the file named config/production.yaml, we are only modifying the root key named object_storage:
object_storage:
  enabled: true

  # Put localhost only if you have a garage instance running on that node
  endpoint: 'http://localhost:3900' # or "garage.example.com" if you have TLS on port 443

  # This entry has been added by our patch, must be set to true
  force_path_style: true

  # Garage supports only one region for now, named garage
  region: 'garage'

  credentials:
    access_key_id: 'GKxxxx'
    secret_access_key: 'xxxx'

  max_upload_part: 2GB

  streaming_playlists:
    bucket_name: 'peertube-playlist'

    # Keep it empty for our example
    prefix: ''

    # You must fill this field to make Peertube use our reverse proxy/website logic
    base_url: 'http://peertube-playlist.web.garage' # Example: 'https://mirror.example.com'

  # Same settings but for webtorrent videos
  videos:
    bucket_name: 'peertube-video'
    prefix: ''
    # You must fill this field to make Peertube use our reverse proxy/website logic
    base_url: 'http://peertube-video.web.garage'
That's all
Everything must be configured now, simply restart Peertube and try to upload a video. You must see in your browser console that data are fetched directly from our bucket (through the reverse proxy).
Miscellaneous
Known bug: The playback does not start and some 400 Bad Request Errors appear in your browser console and on Garage. If the description of the error contains HTTP Invalid Range: InvalidRange, the error is due to a buggy ffmpeg version. You must avoid the 4.4.0 and use either a newer or older version.
Associated issues: #137, #138, #140. These issues are non blocking.
External link: Peertube Documentation > Remote Storage
Mastodon
https://docs.joinmastodon.org/admin/config/#cdn
Matrix
Matrix is a chat communication protocol. Its main stable server implementation, Synapse, provides a module to store media on a S3 backend. Additionally, a server independent media store supporting S3 has been developped by the community, it has been made possible thanks to how the matrix API has been designed and will work with implementations like Conduit, Dendrite, etc.
synapse-s3-storage-provider (synapse only)
Supposing you have a working synapse installation, you can add the module with pip:
pip3 install --user git+https://github.com/matrix-org/synapse-s3-storage-provider.git
Now create a bucket and a key for your matrix instance (note your Key ID and Secret Key somewhere, they will be needed later):
garage key new --name matrix-key
garage bucket create matrix
garage bucket allow matrix --read --write --key matrix-key
Then you must edit your server configuration (eg. /etc/matrix-synapse/homeserver.yaml) and add the media_storage_providers root key:
media_storage_providers:
- module: s3_storage_provider.S3StorageProviderBackend
  store_local: True    # do we want to store on S3 media created by our users?
  store_remote: True   # do we want to store on S3 media created
                       # by users of others servers federated to ours?
  store_synchronous: True  # do we want to wait that the file has been written before returning?
  config:
    bucket: matrix       # the name of our bucket, we chose matrix earlier
    region_name: garage  # only "garage" is supported for the region field
    endpoint_url: http://localhost:3900 # the path to the S3 endpoint
    access_key_id: "GKxxx" # your Key ID
    secret_access_key: "xxxx" # your Secret Key
Note that uploaded media will also be stored locally and this behavior can not be deactivated, it is even required for some operations like resizing images. In fact, your local filesysem is considered as a cache but without any automated way to garbage collect it.
We can build our garbage collector with s3_media_upload, a tool provided with the module.
If you installed the module with the command provided before, you should be able to bring it in your path:
PATH=$HOME/.local/bin/:$PATH
command -v s3_media_upload
Now we can write a simple script (eg ~/.local/bin/matrix-cache-gc):
#!/bin/bash

## CONFIGURATION ##
AWS_ACCESS_KEY_ID=GKxxx
AWS_SECRET_ACCESS_KEY=xxxx
S3_ENDPOINT=http://localhost:3900
S3_BUCKET=matrix
MEDIA_STORE=/var/lib/matrix-synapse/media
PG_USER=matrix
PG_PASS=xxxx
PG_DB=synapse
PG_HOST=localhost
PG_PORT=5432

## CODE ##
PATH=$HOME/.local/bin/:$PATH
cat > database.yaml <<EOF
user: $PG_USER
password: $PG_PASS
database: $PG_DB
host: $PG_HOST
port: $PG_PORT
EOF

s3_media_upload update-db 1d
s3_media_upload --no-progress check-deleted $MEDIA_STORE
s3_media_upload --no-progress upload $MEDIA_STORE $S3_BUCKET --delete --endpoint-url $S3_ENDPOINT
This script will list all the medias that were not accessed in the 24 hours according to your database. It will check if, in this list, the file still exists in the local media store. For files that are still in the cache, it will upload them to S3 if they are not already present (in case of a crash or an initial synchronisation). Finally, the script will delete these files from the cache.
Make this script executable and check that it works:
chmod +x $HOME/.local/bin/matrix-cache-gc
matrix-cache-gc
Add it to your crontab. Open the editor with:
crontab -e
And add a new line. For example, to run it every 10 minutes:
*/10 * * * * $HOME/.local/bin/matrix-cache-gc
External link: Github > matrix-org/synapse-s3-storage-provider
matrix-media-repo (server independent)
External link: matrix-media-repo Documentation > S3
Pixelfed
https://docs.pixelfed.org/technical-documentation/env.html#filesystem
Pleroma
https://docs-develop.pleroma.social/backend/configuration/cheatsheet/#pleromauploaderss3
Lemmy
via pict-rs https://git.asonix.dog/asonix/pict-rs/commit/f9f4fc63d670f357c93f24147c2ee3e1278e2d97
Funkwhale
https://docs.funkwhale.audio/admin/configuration.html#s3-storage
Misskey
https://github.com/misskey-dev/misskey/commit/9d944243a3a59e8880a360cbfe30fd5a3ec8d52d
Prismo
https://gitlab.com/prismosuite/prismo/-/blob/dev/.env.production.sample#L26-33
Owncloud Infinite Scale (ocis)
Unsupported
- Mobilizon: No S3 integration
- WriteFreely: No S3 integration
- Plume: No S3 integration
Websites (Hugo, Jekyll, Publii...)
Garage is also suitable to host static websites. While they can be deployed with traditional CLI tools, some static website generators have integrated options to ease your workflow.
Hugo
Add to your config.toml the following section:
[[deployment.targets]]
URL = "s3://<bucket>?endpoint=<endpoint>&disableSSL=<bool>&s3ForcePathStyle=true®ion=garage"
For example:
[[deployment.targets]]
URL = "s3://my-blog?endpoint=localhost:9000&disableSSL=true&s3ForcePathStyle=true®ion=garage"
Then inform hugo of your credentials:
export AWS_ACCESS_KEY_ID=GKxxx
export AWS_SECRET_ACCESS_KEY=xxx
And finally build and deploy your website:
hugo
hugo deploy
External links:
Publii
It would require a patch either on Garage or on Publii to make both systems work.
Currently, the proposed workaround is to deploy your website manually:
- On the left menu, click on Server, choose Manual Deployment (the logo looks like a compressed file)
- Set your website URL, keep Output type as "Non-compressed catalog"
- Click on Save changes
- Click on Sync your website (bottom left of the app)
- On the new page, click again on Sync your website
- Click on Get website files
- You need to synchronize the output folder you see in your file explorer, we will use minio client.
Be sure that you configured minio client.
Then copy this output folder
mc mirror --overwrite output garage/my-site
Generic (eg. Jekyll)
Some tools do not support sending to a S3 backend but output a compiled folder on your system. We can then use any CLI tool to upload this content to our S3 target.
First, start by configuring minio client.
Then build your website:
jekyll build
And copy jekyll's output folder on S3:
mc mirror --overwrite _site garage/my-site
Repositories (Docker, Nix, Git...)
Whether you need to store and serve binary packages or source code, you may want to deploy a tool referred as a repository or registry. Garage can also help you serve this content.
Gitea
You can use Garage with Gitea to store your git LFS data, your users' avatar, and their attachements.
You can configure a different target for each data type (check [lfs] and [attachment] sections of the Gitea documentation) and you can provide a default one through the [storage] section.
Let's start by creating a key and a bucket (your key id and secret will be needed later, keep them somewhere):
garage key new --name gitea-key
garage bucket create gitea
garage bucket allow gitea --read --write --key gitea-key
Then you can edit your configuration (by default /etc/gitea/conf/app.ini):
[storage]
STORAGE_TYPE=minio
MINIO_ENDPOINT=localhost:3900
MINIO_ACCESS_KEY_ID=GKxxx
MINIO_SECRET_ACCESS_KEY=xxxx
MINIO_BUCKET=gitea
MINIO_LOCATION=garage
MINIO_USE_SSL=false
You can also pass this configuration through environment variables:
GITEA__storage__STORAGE_TYPE=minio
GITEA__storage__MINIO_ENDPOINT=localhost:3900
GITEA__storage__MINIO_ACCESS_KEY_ID=GKxxx
GITEA__storage__MINIO_SECRET_ACCESS_KEY=xxxx
GITEA__storage__MINIO_BUCKET=gitea
GITEA__storage__MINIO_LOCATION=garage
GITEA__storage__MINIO_USE_SSL=false
Then restart your gitea instance and try to upload a custom avatar.
If it worked, you should see some content in your gitea bucket (you must configure your aws command before):
$ aws s3 ls s3://gitea/avatars/
2021-11-10 12:35:47     190034 616ba79ae2b84f565c33d72c2ec50861
External link: Gitea Documentation > Configuration Cheat Sheet
Gitlab
External link: Gitlab Documentation > Object storage
Private NPM Registry (Verdacio)
External link: Verdaccio Github Repository > aws-storage plugin
Docker
Not yet compatible, follow #103.
External link: Docker Documentation > Registry storage drivers > S3 storage driver
Nix
Nix has no repository in its terminology: instead, it breaks down this concept in 2 parts: binary cache and channel.
A channel is a set of .nix definitions that generate definitions for all the software you want to serve.
Because we do not want all our clients to compile all these derivations by themselves, we can compile them once and then serve them as part of our binary cache.
It is possible to use a binary cache without a channel, you only need to serve your nix definitions through another support, like a git repository.
As a first step, we will need to create a bucket on Garage and enabling website access on it:
garage key new --name nix-key
garage bucket create nix.example.com
garage bucket allow nix.example.com --read --write --key nix-key
garage bucket website nix.example.com --allow
If you need more information about exposing buckets as websites on Garage, check Exposing buckets as websites and Configuring a reverse proxy.
Next, we want to check that our bucket works:
echo nix repo > /tmp/index.html
mc cp /tmp/index.html garage/nix/
rm /tmp/index.html

curl https://nix.example.com
# output: nix repo
Binary cache
To serve binaries as part of your cache, you need to sign them with a key specific to nix. You can generate the keypair as follow:
nix-store --generate-binary-cache-key <name> cache-priv-key.pem cache-pub-key.pem
You can then manually sign the packages of your store with the following command:
nix sign-paths --all -k cache-priv-key.pem
Setting a key in nix.conf will do the signature at build time automatically without additional commands.
Edit the nix.conf of your builder:
secret-key-files = /etc/nix/cache-priv-key.pem
Now that your content is signed, you can copy a derivation to your cache. For example, if you want to copy a specific derivation of your store:
nix copy /nix/store/wadmyilr414n7bimxysbny876i2vlm5r-bash-5.1-p8 --to 's3://nix?endpoint=garage.example.com®ion=garage'
Note that if you have not signed your packages, you can append to the end of your S3 URL &secret-key=/etc/nix/cache-priv-key.pem.
Sometimes you don't want to hardcode this store path in your script.
Let suppose that you are working on a codebase that you build with nix-build, you can then run:
nix copy $(nix-build) --to 's3://nix?endpoint=garage.example.com®ion=garage'
This command works because the only thing that nix-build outputs on stdout is the paths of the built derivations in your nix store.
You can include your derivation dependencies:
nix copy $(nix-store -qR $(nix-build)) --to 's3://nix?endpoint=garage.example.com®ion=garage'
Now, your binary cache stores your derivation and all its dependencies.
Just inform your users that they must update their nix.conf file with the following lines:
substituters = https://cache.nixos.org https://nix.example.com
trusted-public-keys = cache.nixos.org-1:6NCHdD59X431o0gWypbMrAURkbJ16ZPMQFGspcDShjY= nix.example.com:eTGL6kvaQn6cDR/F9lDYUIP9nCVR/kkshYfLDJf1yKs=
You must re-add cache.nixorg.org because redeclaring these keys override the previous configuration instead of extending it.
Now, when your clients will run nix-build or any command that generates a derivation for which a hash is already present
on the binary cache, the client will download the result from the cache instead of compiling it, saving lot of time and CPU!
Channels
Channels additionnaly serve Nix definitions, ie. a .nix file referencing
all the derivations you want to serve.
CLI tools
CLI tools allow you to query the S3 API without too many abstractions. These tools are particularly suitable for debug, backups, website deployments or any scripted task that need to handle data.
Minio client (recommended)
Use the following command to set an "alias", i.e. define a new S3 server to be used by the Minio client:
mc alias set \
  garage \
  <endpoint> \
  <access key> \
  <secret key> \
  --api S3v4
Remember that mc is sometimes called mcli (such as on Arch Linux), to avoid conflicts
with Midnight Commander.
Some commands:
# list buckets
mc ls garage/

# list objets in a bucket
mc ls garage/my_files

# copy from your filesystem to garage
mc cp /proc/cpuinfo garage/my_files/cpuinfo.txt

# copy from garage to your filesystem
mc cp garage/my_files/cpuinfo.txt /tmp/cpuinfo.txt

# mirror a folder from your filesystem to garage
mc mirror --overwrite ./book garage/garagehq.deuxfleurs.fr
AWS CLI
Create a file named ~/.aws/credentials and put:
[default]
aws_access_key_id=xxxx
aws_secret_access_key=xxxx
Then a file named ~/.aws/config and put:
[default]
region=garage
Now, supposing Garage is listening on http://127.0.0.1:3900, you can list your buckets with:
aws --endpoint-url http://127.0.0.1:3900 s3 ls
Passing the --endpoint-url parameter to each command is annoying but AWS developers do not provide a corresponding configuration entry.
As a workaround, you can redefine the aws command by editing the file ~/.bashrc:
function aws { command aws --endpoint-url http://127.0.0.1:3900 $@ ; }
Do not forget to run source ~/.bashrc or to start a new terminal before running the next commands.
Now you can simply run:
# list buckets
aws s3 ls

# list objects of a bucket
aws s3 ls s3://my_files

# copy from your filesystem to garage
aws s3 cp /proc/cpuinfo s3://my_files/cpuinfo.txt

# copy from garage to your filesystem
aws s3 cp s3/my_files/cpuinfo.txt /tmp/cpuinfo.txt
rclone
rclone can be configured using the interactive assistant invoked using rclone config.
You can also configure rclone by writing directly its configuration file.
Here is a template rclone.ini configuration file (mine is located at ~/.config/rclone/rclone.conf):
[garage]
type = s3
provider = Other
env_auth = false
access_key_id = <access key>
secret_access_key = <secret key>
region = <region>
endpoint = <endpoint>
force_path_style = true
acl = private
bucket_acl = private
Now you can run:
# list buckets
rclone lsd garage:

# list objects of a bucket aggregated in directories
rclone lsd garage:my-bucket

# copy from your filesystem to garage
echo hello world > /tmp/hello.txt
rclone copy /tmp/hello.txt garage:my-bucket/

# copy from garage to your filesystem
rclone copy garage:quentin.divers/hello.txt .

# see all available subcommands
rclone help
Advice with rclone: use the --fast-list option when accessing buckets with large amounts of objects.
This will tremendously accelerate operations such as rclone sync or rclone ncdu by reducing the number
of ListObjects calls that are made.
s3cmd
Here is a template for the s3cmd.cfg file to talk with Garage:
[default]
access_key = <access key>
secret_key = <secret key>
host_base = <endpoint without http(s)://>
host_bucket = <same as host_base>
use_https = <False or True>
And use it as follow:
# List buckets
s3cmd ls

# s3cmd objects inside a bucket
s3cmd ls s3://my-bucket

# copy from your filesystem to garage
echo hello world > /tmp/hello.txt
s3cmd put /tmp/hello.txt s3://my-bucket/

# copy from garage to your filesystem
s3cmd get s3://my-bucket/hello.txt hello.txt
Cyberduck & duck
TODO
Backups (restic, duplicity...)
Backups are essential for disaster recovery but they are not trivial to manage. Using Garage as your backup target will enable you to scale your storage as needed while ensuring high availability.
Borg Backup
Borg Backup is very popular among the backup tools but it is not yet compatible with the S3 API.
We recommend using any other tool listed in this guide because they are all compatible with the S3 API.
If you still want to use Borg, you can use it with rclone mount.
Restic
External links: Restic Documentation > Amazon S3
Duplicity
External links: Duplicity > man (scroll to "URL Format" and "A note on Amazon S3")
Duplicati
External links: Duplicati Documentation > Storage Providers
knoxite
External links: Knoxite Documentation > Storage Backends
kopia
External links: Kopia Documentation > Repositories
Your code (PHP, JS, Go...)
If you are developping a new application, you may want to use Garage to store your user's media.
The S3 API that Garage uses is a standard REST API, so as long as you can make HTTP requests, you can query it. You can check the S3 REST API Reference from Amazon to learn more.
Developping your own wrapper around the REST API is time consuming and complicated. Instead, there are some libraries already avalaible.
Some of them are maintained by Amazon, some by Minio, others by the community.
PHP
- Amazon aws-sdk-php
Javascript
-
Minio SDK
-
Amazon aws-sdk-js
Golang
-
Minio minio-go-sdk
-
Amazon aws-sdk-go-v2
Python
-
Minio SDK
-
Amazon boto3
Java
-
Minio SDK
-
Amazon aws-sdk-java
Rust
- Amazon aws-rust-sdk
.NET
-
Minio SDK
-
Amazon aws-dotnet-sdk
C++
- Amazon aws-cpp-sdk
Haskell
- Minio SDK
FUSE (s3fs, goofys, s3backer...)
WARNING! Garage is not POSIX compatible. Mounting S3 buckets as filesystems will not provide POSIX compatibility. If you are not careful, you will lose or corrupt your data.
Do not use these FUSE filesystems to store any database files (eg. MySQL, Postgresql, Mongo or sqlite), any daemon cache (dovecot, openldap, gitea, etc.), and more generally any software that use locking, advanced filesystems features or make any synchronisation assumption. Ideally, avoid these solutions at all for any serious or production use.
rclone mount
rclone uses the same configuration when used in CLI and mount mode.
We suppose you have the following entry in your rclone.ini (mine is located in ~/.config/rclone/rclone.conf):
[garage]
type = s3
provider = Other
env_auth = false
access_key_id = <access key>
secret_access_key = <secret key>
region = <region>
endpoint = <endpoint>
force_path_style = true
acl = private
bucket_acl = private
Then you can mount and access any bucket as follow:
# mount the bucket
mkdir /tmp/my-bucket
rclone mount --daemon garage:my-bucket /tmp/my-bucket

# set your working directory to the bucket
cd /tmp/my-bucket

# create a file
echo hello world > hello.txt

# access the file
cat hello.txt

# unmount the bucket
cd
fusermount -u /tmp/my-bucket
External link: rclone documentation > rclone mount
s3fs
External link: s3fs github > README.md
goofys
External link: goofys github > README.md
s3backer
External link: s3backer github > manpage
csi-s3
External link: csi-s3 Github > README.md
Reference Manual
A reference manual contains some extensive descriptions about the features and the behaviour of the software. Reading of this chapter is recommended once you have a good knowledge/understanding of Garage. It will be useful if you want to tune it or to use it in some exotic conditions.
Garage configuration file format reference
Here is an example garage.toml configuration file that illustrates all of the possible options:
metadata_dir = "/var/lib/garage/meta"
data_dir = "/var/lib/garage/data"

block_size = 1048576

replication_mode = "3"

compression_level = 1

rpc_secret = "4425f5c26c5e11581d3223904324dcb5b5d5dfb14e5e7f35e38c595424f5f1e6"
rpc_bind_addr = "[::]:3901"
rpc_public_addr = "[fc00:1::1]:3901"

bootstrap_peers = [
    "563e1ac825ee3323aa441e72c26d1030d6d4414aeb3dd25287c531e7fc2bc95d@[fc00:1::1]:3901",
    "86f0f26ae4afbd59aaf9cfb059eefac844951efd5b8caeec0d53f4ed6c85f332[fc00:1::2]:3901",
    "681456ab91350f92242e80a531a3ec9392cb7c974f72640112f90a600d7921a4@[fc00:B::1]:3901",
    "212fd62eeaca72c122b45a7f4fa0f55e012aa5e24ac384a72a3016413fa724ff@[fc00:F::1]:3901",
]

consul_host = "consul.service"
consul_service_name = "garage-daemon"

sled_cache_capacity = 134217728
sled_flush_every_ms = 2000

[s3_api]
api_bind_addr = "[::]:3900"
s3_region = "garage"
root_domain = ".s3.garage"

[s3_web]
bind_addr = "[::]:3902"
root_domain = ".web.garage"
index = "index.html"
The following gives details about each available configuration option.
Available configuration options
metadata_dir
The directory in which Garage will store its metadata. This contains the node identifier, the network configuration and the peer list, the list of buckets and keys as well as the index of all objects, object version and object blocks.
Store this folder on a fast SSD drive if possible to maximize Garage's performance.
data_dir
The directory in which Garage will store the data blocks of objects.
This folder can be placed on an HDD. The space available for data_dir
should be counted to determine a node's capacity
when configuring it.
block_size
Garage splits stored objects in consecutive chunks of size block_size
(except the last one which might be smaller). The default size is 1MB and
should work in most cases. If you are interested in tuning this, feel free
to do so (and remember to report your findings to us!). If this value is
changed for a running Garage installation, only files newly uploaded will be
affected. Previously uploaded files will remain available. This however
means that chunks from existing files will not be deduplicated with chunks
from newly uploaded files, meaning you might use more storage space that is
optimally possible.
replication_mode
Garage supports the following replication modes:
-
noneor1: data stored on Garage is stored on a single node. There is no redundancy, and data will be unavailable as soon as one node fails or its network is disconnected. Do not use this for anything else than test deployments. -
2: data stored on Garage will be stored on two different nodes, if possible in different zones. Garage tolerates one node failure before losing data. Data should be available read-only when one node is down, but write operations will fail. Use this only if you really have to. -
3: data stored on Garage will be stored on three different nodes, if possible each in a different zones. Garage tolerates two node failure before losing data. Data should be available read-only when two nodes are down, and writes should be possible if only a single node is down.
Note that in modes 2 and 3,
if at least the same number of zones are available, an arbitrary number of failures in
any given zone is tolerated as copies of data will be spread over several zones.
Make sure replication_mode is the same in the configuration files of all nodes.
Never run a Garage cluster where that is not the case.
Changing the replication_mode of a cluster might work (make sure to shut down all nodes
and changing it everywhere at the time), but is not officially supported.
compression_level
Zstd compression level to use for storing blocks.
Values between 1 (faster compression) and 19 (smaller file) are standard compression
levels for zstd. From 20 to 22, compression levels are referred as "ultra" and must be
used with extra care as it will use lot of memory. A value of 0 will let zstd choose a
default value (currently 3). Finally, zstd has also compression designed to be faster
than default compression levels, they range from -1 (smaller file) to -99 (faster
compression).
If you do not specify a compression_level entry, garage will set it to 1 for you. With
this parameters, zstd consumes low amount of cpu and should work faster than line speed in
most situations, while saving some space and intra-cluster
bandwidth.
If you want to totally deactivate zstd in garage, you can pass the special value 'none'. No
zstd related code will be called, your chunks will be stored on disk without any processing.
Compression is done synchronously, setting a value too high will add latency to write queries.
This value can be different between nodes, compression is done by the node which receive the API call.
rpc_secret
Garage uses a secret key that is shared between all nodes of the cluster
in order to identify these nodes and allow them to communicate together.
This key should be specified here in the form of a 32-byte hex-encoded
random string. Such a string can be generated with a command
such as openssl rand -hex 32.
rpc_bind_addr
The address and port on which to bind for inter-cluster communcations (reffered to as RPC for remote procedure calls). The port specified here should be the same one that other nodes will used to contact the node, even in the case of a NAT: the NAT should be configured to forward the external port number to the same internal port nubmer. This means that if you have several nodes running behind a NAT, they should each use a different RPC port number.
rpc_public_addr
The address and port that other nodes need to use to contact this node for RPC calls. This parameter is optional but recommended. In case you have a NAT that binds the RPC port to a port that is different on your public IP, this field might help making it work.
bootstrap_peers
A list of peer identifiers on which to contact other Garage peers of this cluster. These peer identifiers have the following syntax:
<node public key>@<node public IP or hostname>:<port>
In the case where rpc_public_addr is correctly specified in the
configuration file, the full identifier of a node including IP and port can
be obtained by running garage node id and then included directly in the
bootstrap_peers list of other nodes. Otherwise, only the node's public
key will be returned by garage node id and you will have to add the IP
yourself.
consul_host and consul_service_name
Garage supports discovering other nodes of the cluster using Consul. This works only when nodes are announced in Consul by an orchestrator such as Nomad, as Garage is not able to announce itself.
The consul_host parameter should be set to the hostname of the Consul server,
and consul_service_name should be set to the service name under which Garage's
RPC ports are announced.
sled_cache_capacity
This parameter can be used to tune the capacity of the cache used by sled, the database Garage uses internally to store metadata. Tune this to fit the RAM you wish to make available to your Garage instance. More cache means faster Garage, but the default value (128MB) should be plenty for most use cases.
sled_flush_every_ms
This parameters can be used to tune the flushing interval of sled. Increase this if sled is thrashing your SSD, at the risk of losing more data in case of a power outage (though this should not matter much as data is replicated on other nodes). The default value, 2000ms, should be appropriate for most use cases.
The [s3_api] section
api_bind_addr
The IP and port on which to bind for accepting S3 API calls. This endpoint does not suport TLS: a reverse proxy should be used to provide it.
s3_region
Garage will accept S3 API calls that are targetted to the S3 region defined here. API calls targetted to other regions will fail with a AuthorizationHeaderMalformed error message that redirects the client to the correct region.
root_domain
The optionnal suffix to access bucket using vhost-style in addition to path-style request. Note path-style requests are always enabled, whether or not vhost-style is configured. Configuring vhost-style S3 required a wildcard DNS entry, and possibly a wildcard TLS certificate, but might be required by softwares not supporting path-style requests.
If root_domain is s3.garage.eu, a bucket called my-bucket can be interacted with
using the hostname my-bucket.s3.garage.eu.
The [s3_web] section
Garage allows to publish content of buckets as websites. This section configures the behaviour of this module.
bind_addr
The IP and port on which to bind for accepting HTTP requests to buckets configured for website access. This endpoint does not suport TLS: a reverse proxy should be used to provide it.
root_domain
The optionnal suffix appended to bucket names for the corresponding HTTP Host.
For instance, if root_domain is web.garage.eu, a bucket called deuxfleurs.fr
will be accessible either with hostname deuxfleurs.fr.web.garage.eu
or with hostname deuxfleurs.fr.
index
The name of the index file to return for requests ending with / (usually index.html).
Creating and updating a cluster layout
The cluster layout in Garage is a table that assigns to each node a role in the cluster. The role of a node in Garage can either be a storage node with a certain capacity, or a gateway node that does not store data and is only used as an API entry point for faster cluster access. An introduction to building cluster layouts can be found in the production deployment page.
How cluster layouts work in Garage
In Garage, a cluster layout is composed of the following components:
- a table of roles assigned to nodes
- a version number
Garage nodes will always use the cluster layout with the highest version number.
Garage nodes also maintain and synchronize between them a set of proposed role changes that haven't yet been applied. These changes will be applied (or canceled) in the next version of the layout
The following commands insert modifications to the set of proposed role changes for the next layout version (but they do not create the new layout immediately):
garage layout assign [...]
garage layout remove [...]
The following command can be used to inspect the layout that is currently set in the cluster and the changes proposed for the next layout version, if any:
garage layout show
The following commands create a new layout with the specified version number, that either takes into account the proposed changes or cancels them:
garage layout apply --version <new_version_number>
garage layout revert --version <new_version_number>
The version number of the new layout to create must be 1 + the version number
of the previous layout that existed in the cluster. The apply and revert
commands will fail otherwise.
Warnings about Garage cluster layout management
Warning: never make several calls to garage layout apply or garage layout revert with the same value of the --version flag. Doing so can lead to the
creation of several different layouts with the same version number, in which
case your Garage cluster will become inconsistent until fixed. If a call to
garage layout apply or garage layout revert has failed and garage layout show indicates that a new layout with the given version number has not been
set in the cluster, then it is fine to call the command again with the same
version number.
If you are using the garage CLI by typing individual commands in your
shell, you shouldn't have much issues as long as you run commands one after
the other and take care of checking the output of garage layout show
before applying any changes.
If you are using the garage CLI to script layout changes, follow the following recommendations:
-
Make all of your
garageCLI calls to the same RPC host. Do not use thegarageCLI to connect to individual nodes to send them each a piece of the layout changes you are making, as the changes propagate asynchronously between nodes and might not all be taken into account at the time when the new layout is applied. -
Only call
garage layout applyonce, and call it strictly after all of thelayout assignandlayout removecommands have returned.
Garage CLI
The Garage CLI is mostly self-documented. Make use of the help subcommand
and the --help flag to discover all available options.
S3 Compatibility status
Global S3 features
Implemented:
- path-style URLs (
garage.tld/bucket/key) - vhost-style URLs (
bucket.garage.tld/key) - putting and getting objects in buckets
- multipart uploads
- listing objects
- access control on a per-access-key-per-bucket basis
- CORS headers on web endpoint
Not implemented:
- object-level ACL
- object versioning
- encryption
- most
x-amz-headers
Endpoint implementation
All APIs that are not mentionned are not implemented and will return a 501 Not Implemented.
| Endpoint | Status |
|---|---|
| AbortMultipartUpload | Implemented |
| CompleteMultipartUpload | Implemented |
| CopyObject | Implemented |
| CreateBucket | Implemented |
| CreateMultipartUpload | Implemented |
| DeleteBucket | Implemented |
| DeleteBucketCors | Implemented |
| DeleteBucketWebsite | Implemented |
| DeleteObject | Implemented |
| DeleteObjects | Implemented |
| GetBucketCors | Implemented |
| GetBucketLocation | Implemented |
| GetBucketVersioning | Stub (see below) |
| GetBucketWebsite | Implemented |
| GetObject | Implemented |
| HeadBucket | Implemented |
| HeadObject | Implemented |
| ListBuckets | Implemented |
| ListObjects | Implemented, bugs? (see below) |
| ListObjectsV2 | Implemented |
| ListMultipartUpload | Implemented |
| ListParts | Implemented |
| PutObject | Implemented |
| PutBucketCors | Implemented |
| PutBucketWebsite | Partially implemented (see below) |
| UploadPart | Implemented |
| UploadPartCopy | Implemented |
-
GetBucketVersioning: Stub implementation (Garage does not yet support versionning so this always returns "versionning not enabled").
-
ListObjects: Implemented, but there isn't a very good specification of what
encoding-type=urlcovers so there might be some encoding bugs. In our implementation the url-encoded fields are in the same in ListObjects as they are in ListObjectsV2. -
PutBucketWebsite: Implemented, but only stores the index document suffix and the error document path. Redirects are not supported.
Design
The design section helps you to see Garage from a "big picture" perspective. It will allow you to understand if Garage is a good fit for you, how to better use it, how to contribute to it, what can Garage could and could not do, etc.
-
Goals and use cases: This page explains why Garage was concieved and what practical use cases it targets.
-
Related work: This pages presents the theoretical background on which Garage is built, and describes other software storage solutions and why they didn't work for us.
-
Internals: This page enters into more details on how Garage manages data internally.
Talks
We love to talk and hear about Garage, that's why we keep a log here:
-
(fr, 2021-11-13, video) Garage : Mille et une façons de stocker vos données and slides (html) - during RFID#1 event
-
(fr, 2020-12-02) Garage : jouer dans la cour des grands quand on est un hébergeur associatif
Did you write or talk about Garage? Open a pull request to add a link here!
Goals and use cases
Goals and non-goals
Garage is a lightweight geo-distributed data store that implements the Amazon S3 object storage protocole. It enables applications to store large blobs such as pictures, video, images, documents, etc., in a redundant multi-node setting. S3 is versatile enough to also be used to publish a static website.
Garage is an opinionated object storage solutoin, we focus on the following desirable properties:
- Self-contained & lightweight: works everywhere and integrates well in existing environments to target hyperconverged infrastructures.
- Highly resilient: highly resilient to network failures, network latency, disk failures, sysadmin failures.
- Simple: simple to understand, simple to operate, simple to debug.
- Internet enabled: made for multi-sites (eg. datacenters, offices, households, etc.) interconnected through regular Internet connections.
We also noted that the pursuit of some other goals are detrimental to our initial goals. The following has been identified as non-goals (if these points matter to you, you should not use Garage):
- Extreme performances: high performances constrain a lot the design and the infrastructure; we seek performances through minimalism only.
- Feature extensiveness: we do not plan to add additional features compared to the ones provided by the S3 API.
- Storage optimizations: erasure coding or any other coding technique both increase the difficulty of placing data and synchronizing; we limit ourselves to duplication.
- POSIX/Filesystem compatibility: we do not aim at being POSIX compatible or to emulate any kind of filesystem. Indeed, in a distributed environment, such synchronizations are translated in network messages that impose severe constraints on the deployment.
Use-cases
Are you also using Garage in your organization? Open a PR to add your use case here!
Deuxfleurs
Deuxfleurs is an experimental non-profit hosting organization that develops Garage. Deuxfleurs is focused on building highly available infrastructure through redundancy in multiple geographical locations. They use Garage themselves for the following tasks:
-
Hosting of main website, this website, as well as the personal website of many of the members of the organization
-
As a Matrix media backend
-
To store personal data and shared documents through Bagage, a homegrown WebDav-to-S3 proxy
-
In the Drone continuous integration platform to store task logs
-
As a Nix binary cache
-
As a backup target using
rclone
The Deuxfleurs Garage cluster is a multi-site cluster currently composed of 4 nodes in 2 physical locations. In the future it will be expanded to at least 3 physical locations to fully exploit Garage's potential for high availability.
Benchmarks
With Garage, we wanted to build a software defined storage service that follow the KISS principle, that is suitable for geo-distributed deployments and more generally that would work well for community hosting (like a Mastodon instance).
In our benchmarks, we aim to quantify how Garage performs on these goals compared to the other available solutions.
Geo-distribution
The main challenge in a geo-distributed setup is latency between nodes of the cluster. The more a user request will require intra-cluster requests to complete, the more its latency will increase. This is especially true for sequential requests: requests that must wait the result of another request to be sent. We designed Garage without consensus algorithms (eg. Paxos or Raft) to minimize the number of sequential and parallel requests.
This serie of benchmarks quantifies the impact of this design choice.
On a simple simulated network
We start with a controlled environment, all the instances are running on the same (powerful enough) machine.
To control the network latency, we simulate the network with mknet (a tool we developped, based on tc and the linux network stack).
To mesure S3 endpoints latency, we use our own tool s3lat to observe only the intra-cluster latency and not some contention on the nodes (CPU, RAM, disk I/O, network bandwidth, etc.).
Compared to other benchmark tools, S3Lat sends only one (small) request at the same time and measures its latency.
We selected 5 standard endpoints that are often in the critical path: ListBuckets, ListObjects, GetObject, PutObject and RemoveObject.
In this first benchmark, we consider 5 instances that are located in a different place each. To simulate the distance, we configure mknet with a RTT between each node of 100 ms +/- 20 ms of jitter. We get the following graph, where the colored bars represent the mean latency while the error bars the minimum and maximum one:
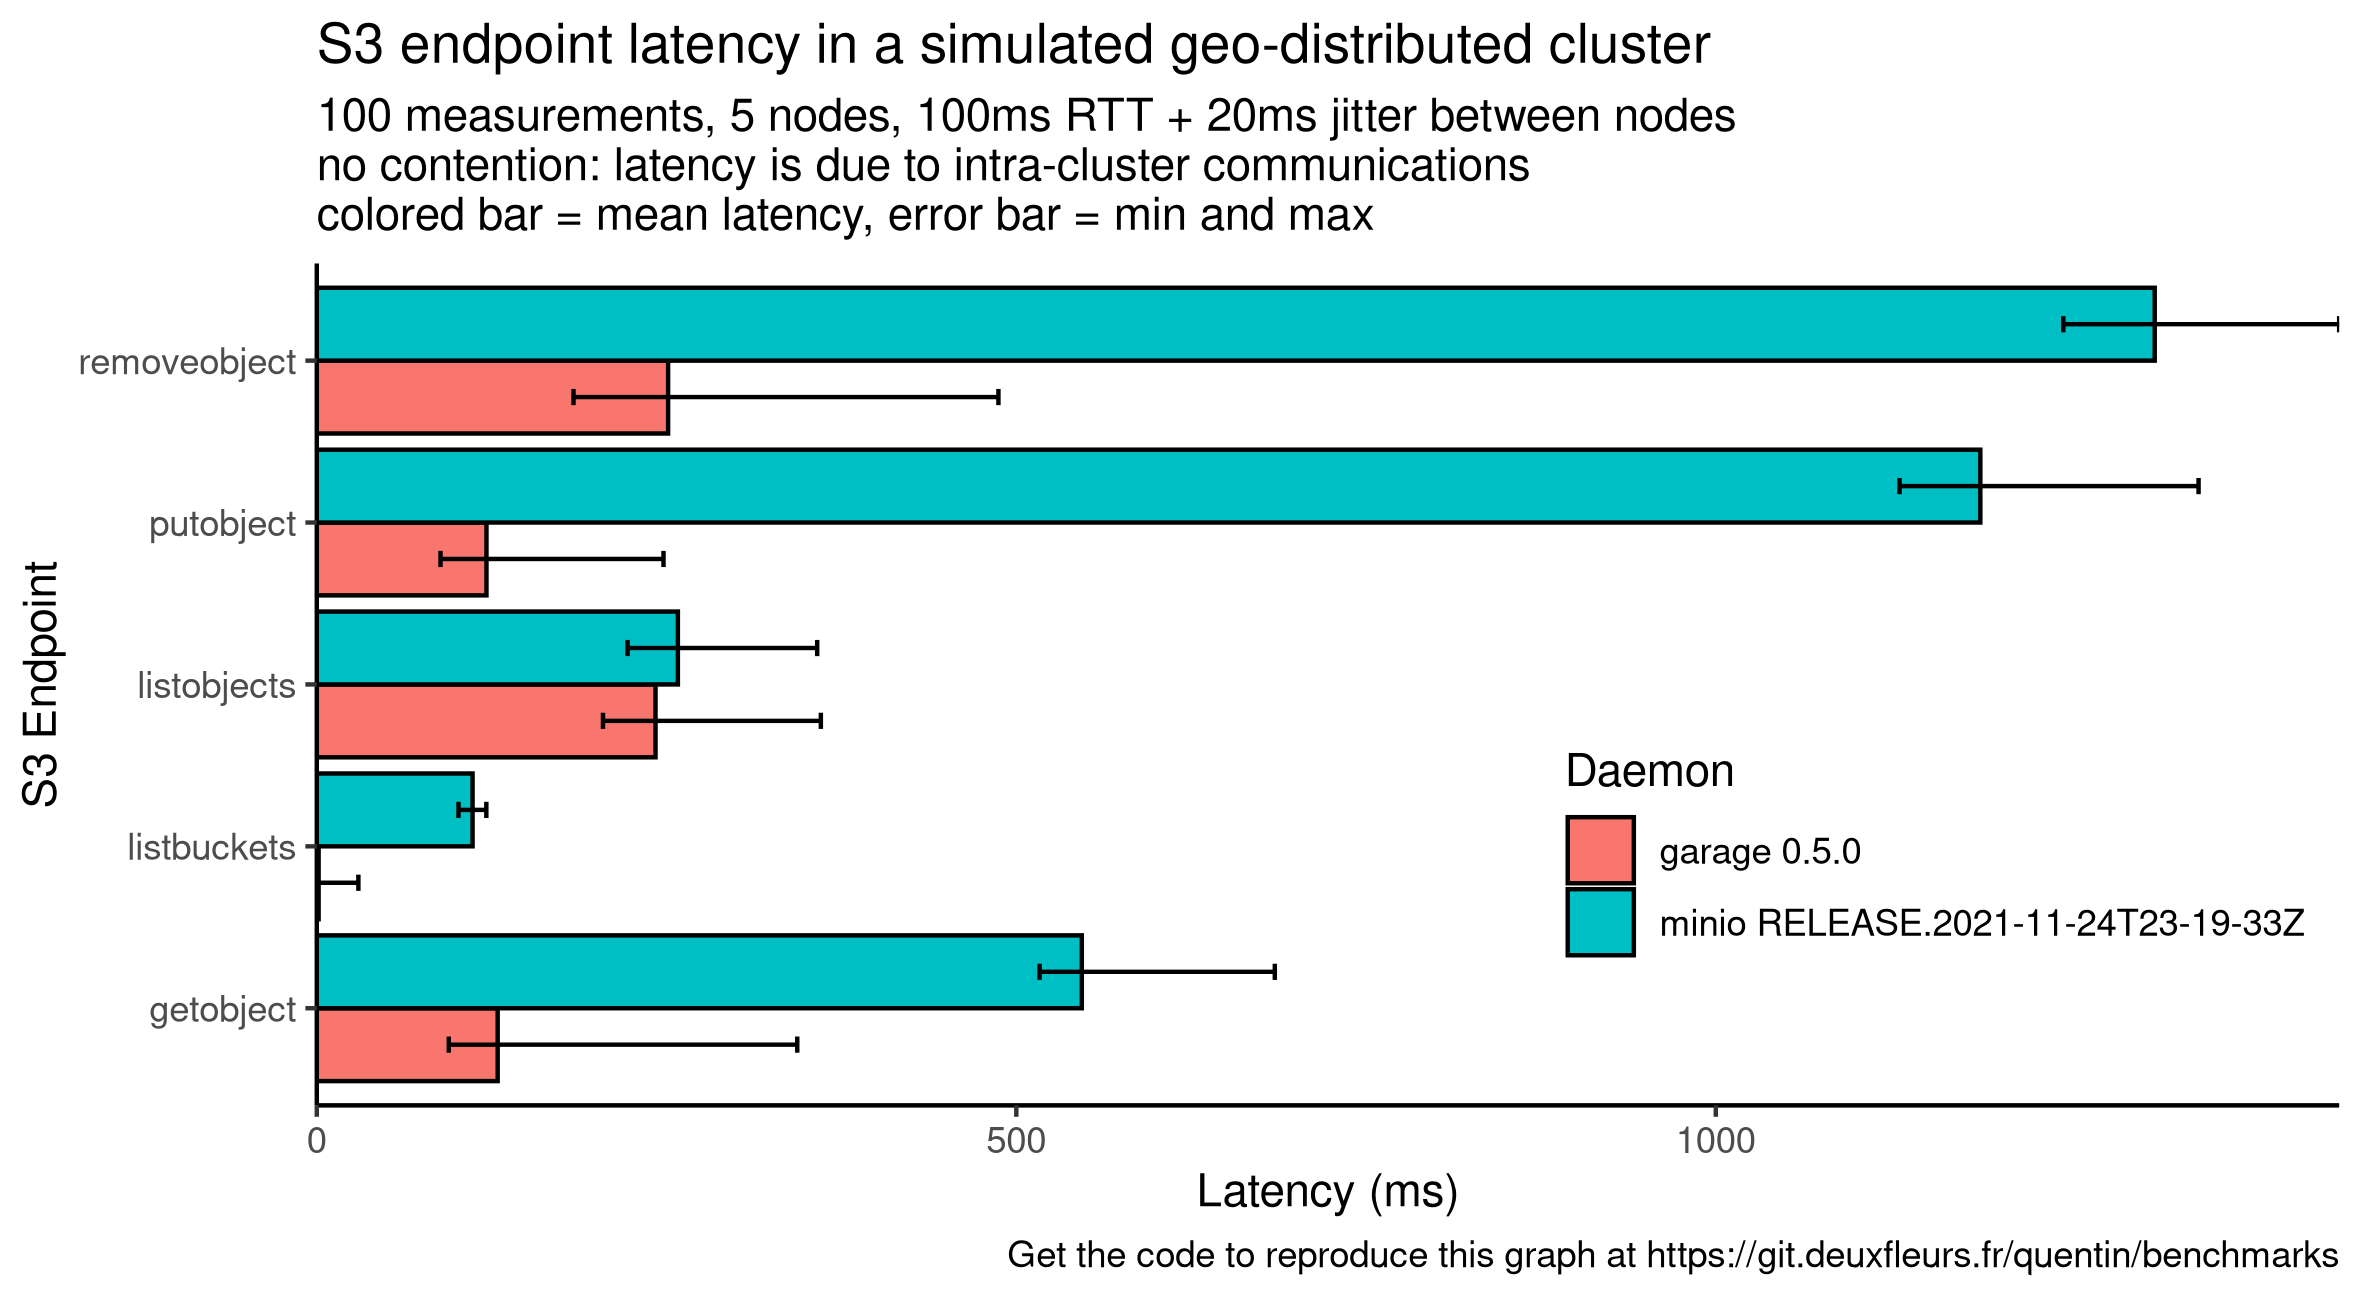
Compared to garage, minio latency drastically increases on 3 endpoints: GetObject, PutObject, RemoveObject.
We suppose that these requests on minio make transactions over Raft, involving 4 sequential requests: 1) sending the message to the leader, 2) having the leader dispatch it to the other nodes, 3) waiting for the confirmation of followers and finally 4) commiting it. With our current configuration, one Raft transaction will take around 400 ms. GetObject seems to correlate to 1 transaction while PutObject and RemoveObject seems to correlate to 2 or 3. Reviewing minio code would be required to confirm this hypothesis.
Conversely, garage uses an architecture similar to DynamoDB and never require global cluster coordination to answer a request. Instead, garage can always contact the right node in charge of the requested data, and can answer in as low as one request in the case of GetObject and PutObject. We also observed that Garage latency, while often lower to minio, is more dispersed: garage is still in beta and has not received any performance optimization yet.
As a conclusion, Garage performs well in such setup while minio will be hard to use, especially for interactive use cases.
On a complex simulated network
This time we consider a more heterogeneous network with 6 servers spread in 3 datacenter, giving us 2 servers per datacenters. We consider that intra-DC communications are now very cheap with a latency of 0.5ms and without any jitter. The inter-DC remains costly with the same value as before (100ms +/- 20ms of jitter). We plot a similar graph as before:

This new graph is very similar to the one before, neither minio or garage seems to benefit from this new topology, but they also do not suffer from it.
Considering garage, this is expected: nodes in the same DC are put in the same zone, and then data are spread on different zones for data resiliency and availaibility. Then, in the default mode, requesting data requires to query at least 2 zones to be sure that we have the most up to date information. These requests will involve at least one inter-DC communication. In other words, we prioritize data availability and synchronization over raw performances.
Minio's case is a bit different as by default a minio cluster is not location aware, so we can't explain its performances through location awareness. We know that minio has a multi site mode but it is definitely not a first class citizen: data are asynchronously replicated from one minio cluster to another. We suppose that, due to the consensus, for many of its requests minio will wait for a response of the majority of the server, also involving inter-DC communications.
As a conclusion, our new topology did not influence garage or minio performances, confirming that in presence of latency, garage is the best fit.
On a real world deployment
TODO
Performance stability
A storage cluster will encounter different scenario over its life, many of them will not be predictable. In this context, we argue that, more than peak performances, we should seek predictable and stable performances to ensure data availability.
Reference
TODO
On a degraded cluster
TODO
At scale
TODO
Related work
Context
Data storage is critical: it can lead to data loss if done badly and/or on hardware failure. Filesystems + RAID can help on a single machine but a machine failure can put the whole storage offline. Moreover, it put a hard limit on scalability. Often this limit can be pushed back far away by buying expensive machines. But here we consider non specialized off the shelf machines that can be as low powered and subject to failures as a raspberry pi.
Distributed storage may help to solve both availability and scalability problems on these machines. Many solutions were proposed, they can be categorized as block storage, file storage and object storage depending on the abstraction they provide.
Overview
Block storage is the most low level one, it's like exposing your raw hard drive over the network. It requires very low latencies and stable network, that are often dedicated. However it provides disk devices that can be manipulated by the operating system with the less constraints: it can be partitioned with any filesystem, meaning that it supports even the most exotic features. We can cite iSCSI or Fibre Channel. Openstack Cinder proxy previous solution to provide an uniform API.
File storage provides a higher abstraction, they are one filesystem among others, which means they don't necessarily have all the exotic features of every filesystem. Often, they relax some POSIX constraints while many applications will still be compatible without any modification. As an example, we are able to run MariaDB (very slowly) over GlusterFS... We can also mention CephFS (read RADOS whitepaper), Lustre, LizardFS, MooseFS, etc. OpenStack Manila proxy previous solutions to provide an uniform API.
Finally object storages provide the highest level abstraction. They are the testimony that the POSIX filesystem API is not adapted to distributed filesystems. Especially, the strong concistency has been dropped in favor of eventual consistency which is way more convenient and powerful in presence of high latencies and unreliability. We often read about S3 that pioneered the concept that it's a filesystem for the WAN. Applications must be adapted to work for the desired object storage service. Today, the S3 HTTP REST API acts as a standard in the industry. However, Amazon S3 source code is not open but alternatives were proposed. We identified Minio, Pithos, Swift and Ceph. Minio/Ceph enforces a total order, so properties similar to a (relaxed) filesystem. Swift and Pithos are probably the most similar to AWS S3 with their consistent hashing ring. However Pithos is not maintained anymore. More precisely the company that published Pithos version 1 has developped a second version 2 but has not open sourced it. Some tests conducted by the ACIDES project have shown that Openstack Swift consumes way more resources (CPU+RAM) that we can afford. Furthermore, people developing Swift have not designed their software for geo-distribution.
There were many attempts in research too. I am only thinking to LBFS that was used as a basis for Seafile. But none of them have been effectively implemented yet.
Existing software
MinIO: MinIO shares our Self-contained & lightweight goal but selected two of our non-goals: Storage optimizations through erasure coding and POSIX/Filesystem compatibility through strong consistency. However, by pursuing these two non-goals, MinIO do not reach our desirable properties. Firstly, it fails on the Simple property: due to the erasure coding, MinIO has severe limitations on how drives can be added or deleted from a cluster. Secondly, it fails on the Internet enabled property: due to its strong consistency, MinIO is latency sensitive. Furthermore, MinIO has no knowledge of "sites" and thus can not distribute data to minimize the failure of a given site.
Openstack Swift: OpenStack Swift at least fails on the Self-contained & lightweight goal. Starting it requires around 8GB of RAM, which is too much especially in an hyperconverged infrastructure. We also do not classify Swift as Simple.
Ceph: This review holds for the whole Ceph stack, including the RADOS paper, Ceph Object Storage module, the RADOS Gateway, etc. At its core, Ceph has been designed to provide POSIX/Filesystem compatibility which requires strong consistency, which in turn makes Ceph latency-sensitive and fails our Internet enabled goal. Due to its industry oriented design, Ceph is also far from being Simple to operate and from being Self-contained & lightweight which makes it hard to integrate it in an hyperconverged infrastructure. In a certain way, Ceph and MinIO are closer together than they are from Garage or OpenStack Swift.
Pithos: Pithos has been abandonned and should probably not used yet, in the following we explain why we did not pick their design. Pithos was relying as a S3 proxy in front of Cassandra (and was working with Scylla DB too). From its designers' mouth, storing data in Cassandra has shown its limitations justifying the project abandonment. They built a closed-source version 2 that does not store blobs in the database (only metadata) but did not communicate further on it. We considered there v2's design but concluded that it does not fit both our Self-contained & lightweight and Simple properties. It makes the development, the deployment and the operations more complicated while reducing the flexibility.
Riak CS: Not written yet
IPFS: Not written yet
Specific research papers
Not yet written
Internals
Overview
TODO: write this section
-
The Dynamo ring (see this paper and that paper)
-
CRDTs (see this paper)
-
Consistency model of Garage tables
In the meantime, you can find some information at the following links:
Garbage collection
A faulty garbage collection procedure has been the cause of critical bug #39. This precise bug was fixed in the code, however there are potentially more general issues with the garbage collector being too eager and deleting things too early. This has been the subject of PR #135. This section summarizes the discussions on this topic.
Rationale: we want to ensure Garage's safety by making sure things don't get deleted from disk if they are still needed. Two aspects are involved in this.
1. Garbage collection of table entries (in meta/ directory)
The Entry trait used for table entries (defined in tables/schema.rs)
defines a function is_tombstone() that returns true if that entry
represents an entry that is deleted in the table. CRDT semantics by default
keep all tombstones, because they are necessary for reconciliation: if node A
has a tombstone that supersedes a value x, and node B has value x, A has to
keep the tombstone in memory so that the value x can be properly deleted at
node B. Otherwise, due to the CRDT reconciliation rule, the value x from B
would flow back to A and a deleted item would reappear in the system.
Here, we have some control on the nodes involved in storing Garage data.
Therefore we have a garbage collector that is able to delete tombstones UNDER
CERTAIN CONDITIONS. This garbage collector is implemented in table/gc.rs. To
delete a tombstone, the following condition has to be met:
- All nodes responsible for storing this entry are aware of the existence of the tombstone, i.e. they cannot hold another version of the entry that is superseeded by the tombstone. This ensures that deleting the tombstone is safe and that no deleted value will come back in the system.
Garage makes use of Sled's atomic operations (such as compare-and-swap and transactions) to ensure that only tombstones that have been correctly propagated to other nodes are ever deleted from the local entry tree.
This GC is safe in the following sense: no non-tombstone data is ever deleted from Garage tables.
However, there is an issue with the way this interacts with data rebalancing in the case when a partition is moving between nodes. If a node has some data of a partition for which it is not responsible, it has to offload it. However that offload process takes some time. In that interval, the GC does not check with that node if it has the tombstone before deleting the tombstone, so perhaps it doesn't have it and when the offload finally happens, old data comes back in the system.
PR 135 mostly fixes this by implementing a 24-hour delay before anything is garbage collected in a table. This works under the assumption that rebalances that follow data shuffling terminate in less than 24 hours.
However, in distributed systems, it is generally considered a bad practice to make assumptions that information propagates in a certain time interval: this consists in making a synchrony assumption, meaning that we are basically assuming a computing model that has much stronger properties than otherwise. To maximize the applicability of Garage, we would like to remove this assumption, and implement a system where time does not play a role. To do this, we would need to find a way to safely disable the GC when data is being shuffled around, and safely detect that the shuffling has terminated and thus the GC can be resumed. This introduces some complexity to the protocol and hasn't been tackled yet.
2. Garbage collection of data blocks (in data/ directory)
Blocks in the data directory are reference-counted. In Garage versions before PR #135, blocks could get deleted from local disk as soon as their reference counter reached zero. We had a mechanism to not trigger this immediately at the rc-reaches-zero event, but the cleanup could be triggered by other means (for example by a block repair operation...). PR #135 added a safety measure so that blocks never get deleted in a 10 minute interval following the time when the RC reaches zero. This is a measure to make impossible race conditions such as #39. We would have liked to use a larger delay (e.g. 24 hours), but in the case of a rebalance of data, this would have led to the disk utilization to explode during the rebalancing, only to shrink again after 24 hours. The 10-minute delay is a compromise that gives good security while not having this problem of disk space explosion on rebalance.
Development
Now that you are a Garage expert, you want to enhance it, you are in the right place! We discuss here how to hack on Garage, how we manage its development, etc.
Rust API (docs.rs)
If you encounter a specific bug in Garage or plan to patch it, you may jump directly to the source code's documentation!
- garage_api - contains the S3 standard API endpoint
- garage_model - contains Garage's model built on the table abstraction
- garage_rpc - contains Garage's federation protocol
- garage_table - contains core Garage's CRDT datatypes
- garage_util - contains garage helpers
- garage_web - contains the S3 website endpoint
Setup your development environment
Depending on your tastes, you can bootstrap your development environment in a traditional Rust way or through Nix.
The Nix way
Nix is a generic package manager we use to precisely define our development environment. Instructions on how to install it are given on their Download page.
Check that your installation is working by running the following commands:
nix-shell --version
nix-build --version
nix-env   --version
Now, you can clone our git repository (run nix-env -iA git if you do not have git yet):
git clone https://git.deuxfleurs.fr/Deuxfleurs/garage
cd garage
Optionnaly, you can use our nix.conf file to speed up compilations:
sudo mkdir -p /etc/nix
sudo cp nix/nix.conf /etc/nix/nix.conf
sudo killall nix-daemon
Now you can enter our nix-shell, all the required packages will be downloaded but they will not pollute your environment outside of the shell:
nix-shell
You can use the traditionnal Rust development workflow:
cargo build  # compile the project
cargo run    # execute the project
cargo test   # run the tests
cargo fmt    # format the project, run it before any commit!
cargo clippy # run the linter, run it before any commit!
You can build the project with Nix by running:
nix-build
You can parallelize the build (if you use our nix.conf file, it is already automatically done).
To use all your cores when building a derivation use -j, and to build multiple derivations at once use --max-jobs.
The special value auto will be replaced by the number of cores of your computer.
An example:
nix-build -j $(nproc) --max-jobs auto
Our build has multiple parameters you might want to set:
releasebuild with release optimisations instead of debugtarget allowsfor cross compilationcompileModecan be set to test or bench to build a unit test runnergit_versionto inject the hash to display when runninggarage stats
An example:
nix-build \
  --arg release true \
  --argstr target x86_64-unknown-linux-musl \
  --argstr compileMode build \
  --git_version $(git rev-parse HEAD)
The result is located in result/bin. You can pass arguments to cross compile: check .drone.yml for examples.
If you modify a Cargo.toml or regenerate any Cargo.lock, you must run cargo2nix:
cargo2nix -f
Many tools like rclone, mc (minio-client), or aws (awscliv2) will be available in your environment and will be useful to test Garage.
This is the recommended method.
The Rust way
You need a Rust distribution installed on your computer. The most simple way is to install it from rustup. Please avoid using your package manager to install Rust as some tools might be outdated or missing.
Now, check your Rust distribution works by running the following commands:
rustc --version
cargo --version
rustfmt --version
clippy-driver --version
Now, you need to clone our git repository (how to install git):
git clone https://git.deuxfleurs.fr/Deuxfleurs/garage
cd garage
You can now use the following commands:
cargo build  # compile the project
cargo run    # execute the project
cargo test   # run the tests
cargo fmt    # format the project, run it before any commit!
cargo clippy # run the linter, run it before any commit!
This is specific to our project, but you will need one last tool, cargo2nix.
To install it, run:
cargo install --git https://github.com/superboum/cargo2nix --branch main cargo2nix
You must use it every time you modify a Cargo.toml or regenerate a Cargo.lock file as follow:
cargo build  # Rebuild Cargo.lock if needed
cargo2nix -f
It will output a Cargo.nix file which is a specific Cargo.lock file dedicated to Nix that is required by our CI
which means you must include it in your commits.
Later, to use our scripts and integration tests, you might need additional tools.
These tools are listed at the end of the shell.nix package in the nativeBuildInputs part.
It is up to you to find a way to install the ones you need on your computer.
A global drawback of this method is that it is up to you to adapt your environment to the one defined in the Nix files.
Development scripts
We maintain a script/ folder that contains some useful script to ease testing on Garage.
A fully integrated script, test-smoke.sh, runs some basic tests on various tools such as minio client, awscli and rclone.
To run it, enter a nix-shell (or install all required tools) and simply run:
nix-build # or cargo build
./script/test-smoke.sh
If something fails, you can find useful logs in /tmp/garage.log.
You can inspect the generated configuration and local data created by inspecting your /tmp directory:
the script creates files and folder prefixed with the name "garage".
Bootstrapping a test cluster
Under the hood test-smoke.sh uses multiple helpers scripts you can also run in case you want to manually test Garage.
In this section, we introduce 3 scripts to quickly bootstrap a full test cluster with 3 instances.
1. Start each daemon
./script/dev-cluster.sh
This script spawns 3 Garage instances with 3 configuration files.
You can inspect the detailed configuration, including ports, by inspecting /tmp/config.1 (change 1 by the instance number you want).
This script also spawns a simple HTTPS reverse proxy through socat for the S3 endpoint that listens on port 4443.
Some libraries might require a TLS endpoint to work, refer to our issue #64 for more detailed information on this subject.
This script covers the Launching the garage server section of our Quick start page.
2. Make them join the cluster
./script/dev-configure.sh
This script will configure each instance by assigning them a zone (dc1) and a weight (1).
This script covers the Configuring your Garage node section of our Quick start page.
3. Create a key and a bucket
./script/dev-bucket.sh
This script will create a bucket named eprouvette with a key having read and write rights on this bucket.
The key is stored in a filed named /tmp/garage.s3 and can be used by the following tools to pre-configure them.
This script covers the Creating buckets and keys section of our Quick start page.
Handlers for generic tools
We provide wrappers for some CLI tools that configure themselves for your development cluster. They are meant to save you some configuration time as to use them, you are only required to source the right file.
awscli
source ./script/dev-env-aws.sh

# some examples
aws s3 ls s3://eprouvette
aws s3 cp /proc/cpuinfo s3://eprouvette/cpuinfo.txt
minio-client
source ./script/dev-env-mc.sh

# some examples
mc ls garage/
mc cp /proc/cpuinfo garage/eprouvette/cpuinfo.txt
rclone
source ./script/dev-env-rclone.sh

# some examples
rclone lsd garage:
rclone copy /proc/cpuinfo garage:eprouvette/cpuinfo.txt
s3cmd
source ./script/dev-env-s3cmd.sh

# some examples
s3cmd ls
s3cmd put /proc/cpuinfo s3://eprouvette/cpuinfo.txt
duck
Warning! Duck is not yet provided by nix-shell.
source ./script/dev-env-duck.sh

# some examples
duck --list garage:/
duck --upload garage:/eprouvette/ /proc/cpuinfo
Release process
Before releasing a new version of Garage, our code pass through a succession of checks and transformations. We define them as our release process.
Trigger and classify a release
While we run some tests on every commits, we do not make a release for all of them.
A release can be triggered manually by "promoting" a successful build.
Otherwise, every weeks, a release build is triggered on the main branch.
If the build is from a tag following the regex: v[0-9]+\.[0-9]+\.[0-9]+, it will be listed as stable.
If it is a tag but with a different format, it will be listed as Extra.
Otherwise, if it is a commit, it will be listed as development.
This logic is defined in nix/build_index.nix.
Testing
For each commit, we first pass the code to a formatter (rustfmt) and a linter (clippy). Then we try to build it in debug mode and run both unit tests and our integration tests.
Additionnaly, when releasing, our integration tests are run on the release build for amd64 and i686.
Generated Artifacts
We generate the following binary artifacts for now:
- architecture: amd64, i686, aarch64, armv6
- os: linux
- format: static binary, docker container
Additionnaly we also build two web pages:
- the documentation (this website)
- the release page
We publish the static binaries on our own garage cluster (you can access them through the releases page) and the docker containers on Docker Hub.
Automation
We automated our release process with Nix and Drone to make it more reliable. Here we describe how we have done in case you want to debug or improve it.
Caching build steps
To speed up the CI, we use the caching feature provided by Nix.
You can benefit from it by using our provided nix.conf as recommended or by simply adding the following lines to your file:
substituters = https://cache.nixos.org https://nix.web.deuxfleurs.fr
trusted-public-keys = cache.nixos.org-1:6NCHdD59X431o0gWypbMrAURkbJ16ZPMQFGspcDShjY= nix.web.deuxfleurs.fr:eTGL6kvaQn6cDR/F9lDYUIP9nCVR/kkshYfLDJf1yKs=
Sending to the cache is done through nix copy, for example:
nix copy --to 's3://nix?endpoint=garage.deuxfleurs.fr®ion=garage&secret-key=/etc/nix/signing-key.sec' result
Note that you need the signing key. In our case, it is stored as a secret in Drone.
The previous command will only send the built packet and not its dependencies.
To send its dependency, a tool named nix-copy-closure has been created but it is not compatible with the S3 protocol.
Instead, you can use the following commands to list all the runtime dependencies:
nix copy \
--to 's3://nix?endpoint=garage.deuxfleurs.fr®ion=garage&secret-key=/etc/nix/signing-key.sec' \
$(nix-store -qR result/)
We could also write this expression with xargs but this tool is not available in our container.
But in certain cases, we want to cache compile time dependencies also. For example, the Nix project does not provide binaries for cross compiling to i686 and thus we need to compile gcc on our own. We do not want to compile gcc each time, so even if it is a compile time dependency, we want to cache it.
This time, the command is a bit more involved:
nix copy --to \
's3://nix?endpoint=garage.deuxfleurs.fr®ion=garage&secret-key=/etc/nix/signing-key.sec' \
$(nix-store -qR --include-outputs \
$(nix-instantiate))
This is the command we use in our CI as we expect the final binary to change, so we mainly focus on caching our development dependencies.
Currently there is no automatic garbage collection of the cache: we should monitor its growth. Hopefully, we can erase it totally without breaking any build, the next build will only be slower.
In practise, we concluded that we do not want to cache all the compilation dependencies. Instead, we want to cache the toolchain we use to build Garage each time we change it. So we removed from Drone any automatic update of the cache and instead handle them manually with:
source ~/.awsrc
nix-shell --run 'refresh_toolchain'
Internally, it will run nix-build on nix/toolchain.nix and send the output plus its depedencies to the cache.
To erase the cache:
mc rm --recursive --force 'garage/nix/'
Publishing Garage
We defined our publishing logic in Nix, mostly as shell hooks.
You can inspect them in shell.nix to see exactly how.
Here, we will give a quick explanation on how to use them to manually publish a release.
Supposing you just have built garage as follow:
nix-build --arg release true
To publish a static binary in result/bin on garagehq, run:
export AWS_ACCESS_KEY_ID=xxx
export AWS_SECRET_ACCESS_KEY=xxx
export DRONE_TAG=handcrafted-1.0.0 # or DRONE_COMMIT
export TARGET=x86_64-unknown-linux-musl

nix-shell --run to_s3
To create and publish a docker container, run:
export DOCKER_AUTH='{ "auths": { "https://index.docker.io/v1/": { "auth": "xxxx" }}}'
export DOCKER_PLATFORM='linux/amd64' # check GOARCH and GOOS from golang.org
export CONTAINER_NAME='me/amd64_garage'
export CONTAINER_TAG='handcrafted-1.0.0'

nix-shell --run to_docker
To rebuild the release page, run:
export AWS_ACCESS_KEY_ID=xxx
export AWS_SECRET_ACCESS_KEY=xxx

nix-shell --run refresh_index
If you want to compile for different architectures, you will need to repeat all these commands for each architecture.
In practise, and except for debugging, you will never directly run these commands. Release is handled by drone
Drone
Our instance is available at https://drone.deuxfleurs.fr.
You need an account on https://git.deuxfleurs.fr to use it.
Drone CLI - Drone has a CLI tool to interact with. It can be downloaded from its Github release page.
To communicate with our instance, you must setup some environment variables. You can get them from your Account Settings.
To make drone easier to use, you could create a ~/.dronerc that you could source each time you want to use it.
export DRONE_SERVER=https://drone.deuxfleurs.fr
export DRONE_TOKEN=xxx
drone info
The CLI tool is very self-discoverable, just append --help to each subcommands.
Start with:
drone --help
.drone.yml - The builds steps are defined in .drone.yml.
You can not edit this file without resigning it.
To sign it, you must be a maintainer and then run:
drone sign --save Deuxfleurs/garage
Looking at the file, you will see that most of the commands are nix-shell and nix-build commands with various parameters.
Miscellaneous Notes
Quirks about cargo2nix/rust in Nix
If you use submodules in your crate (like crdt and replication in garage_table), you must list them in default.nix
The Windows target does not work. it might be solvable through overrides. Indeed, we pass x86_64-pc-windows-gnu but mingw need x86_64-w64-mingw32
We have a simple PR on cargo2nix that fixes critical bugs but the project does not seem very active currently. We must use my patched version of cargo2nix to enable i686 and armv6l compilation. We might need to contribute to cargo2nix in the future.
Nix
Nix has no armv7 + musl toolchains but armv7l is backward compatible with armv6l.
cat > $HOME/.awsrc <<EOF
export AWS_ACCESS_KEY_ID="xxx"
export AWS_SECRET_ACCESS_KEY="xxx"
EOF
# source each time you want to send on the cache
source ~/.awsrc
# copy garage build dependencies (and not only the output)
nix-build
nix-store -qR --include-outputs $(nix-instantiate default.nix)
| xargs nix copy --to 's3://nix?endpoint=garage.deuxfleurs.fr®ion=garage'
# copy shell dependencies
nix-build shell.nix -A inputDerivation
nix copy $(nix-store -qR result/) --to 's3://nix?endpoint=garage.deuxfleurs.fr®ion=garage'
More example of nix-copy
# nix-build produces a result/ symlink
nix copy result/ --to 's3://nix?endpoint=garage.deuxfleurs.fr®ion=garage'
# alternative ways to use nix copy
nix copy nixpkgs.garage --to ...
nix copy /nix/store/3rbb9qsc2w6xl5xccz5ncfhy33nzv3dp-crate-garage-0.3.0 --to ...
Clear the cache:
mc rm --recursive --force garage/nix/
A desirable nix.conf for a consumer:
substituters = https://cache.nixos.org https://nix.web.deuxfleurs.fr
trusted-public-keys = cache.nixos.org-1:6NCHdD59X431o0gWypbMrAURkbJ16ZPMQFGspcDShjY= nix.web.deuxfleurs.fr:eTGL6kvaQn6cDR/F9lDYUIP9nCVR/kkshYfLDJf1yKs=
And now, whenever you run a command like:
nix-shell
nix-build
Our cache will be checked.
Some references about Nix
- https://doc.rust-lang.org/nightly/rustc/platform-support.html
- https://nix.dev/tutorials/cross-compilation
- https://nixos.org/manual/nix/unstable/package-management/s3-substituter.html
- https://fzakaria.com/2020/09/28/nix-copy-closure-your-nix-shell.html
- http://www.lpenz.org/articles/nixchannel/index.html
Drone
Do not try to set a build as trusted from the interface or the CLI tool,
your request would be ignored. Instead, directly edit the database (table repos, column repo_trusted).
Drone can do parallelism both at the step and the pipeline level. At the step level, parallelism is restricted to the same runner.
Building Docker containers
We were:
- Unable to use the official Docker plugin because
- it requires to mount docker socket in the container but it is not recommended
- you cant set the platform when building
- Unable to use buildah because it needs
CLONE_USERNScapability - Unable to use the kaniko plugin for Drone as we can't set the target platform
- Unable to use the kaniko container provided by Google as we can't run arbitrary logic: we need to put our secret in .docker/config.json.
Finally we chose to build kaniko through nix and use it in a nix-shell.
Working Documents
Working documents are documents that reflect the fact that Garage is a software that evolves quickly. They are a way to communicate our ideas, our changes, and so on before or while we are implementing them in Garage. If you like to live on the edge, it could also serve as a documentation of our next features to be released.
Ideally, once the feature/patch has been merged, the working document should serve as a source to update the rest of the documentation and then be removed.
S3 compatibility target
If there is a specific S3 functionnality you have a need for, feel free to open a PR to put the corresponding endpoints higher in the list. Please explain your motivations for doing so in the PR message.
| Priority | Endpoints |
|---|---|
| S-tier (high priority) | |
| HeadBucket | |
| GetBucketLocation | |
| CreateBucket | |
| DeleteBucket | |
| ListBuckets | |
| ListObjects | |
| ListObjectsV2 | |
| HeadObject | |
| GetObject | |
| PutObject | |
| CopyObject | |
| DeleteObject | |
| DeleteObjects | |
| CreateMultipartUpload | |
| CompleteMultipartUpload | |
| AbortMultipartUpload | |
| UploadPart | |
| ListMultipartUploads | |
| ListParts | |
| A-tier | |
| GetBucketCors | |
| PutBucketCors | |
| DeleteBucketCors | |
| UploadPartCopy | |
| GetBucketWebsite | |
| PutBucketWebsite | |
| DeleteBucketWebsite | |
| ~~~~~~~~~~~~~~~~~~~~~~~~~~ | ~~~~~~~~~~~~~~~~~~~~~~~~~~~~~~~~~~~~ |
| B-tier | |
| GetBucketAcl | |
| PutBucketAcl | |
| GetObjectLockConfiguration | |
| PutObjectLockConfiguration | |
| GetObjectRetention | |
| PutObjectRetention | |
| GetObjectLegalHold | |
| PutObjectLegalHold | |
| C-tier | |
| GetBucketVersioning | |
| PutBucketVersioning | |
| ListObjectVersions | |
| GetObjectAcl | |
| PutObjectAcl | |
| GetBucketLifecycleConfiguration | |
| PutBucketLifecycleConfiguration | |
| DeleteBucketLifecycle | |
| garbage-tier | |
| DeleteBucketEncryption | |
| DeleteBucketAnalyticsConfiguration | |
| DeleteBucketIntelligentTieringConfiguration | |
| DeleteBucketInventoryConfiguration | |
| DeleteBucketMetricsConfiguration | |
| DeleteBucketOwnershipControls | |
| DeleteBucketPolicy | |
| DeleteBucketReplication | |
| DeleteBucketTagging | |
| DeleteObjectTagging | |
| DeletePublicAccessBlock | |
| GetBucketAccelerateConfiguration | |
| GetBucketAnalyticsConfiguration | |
| GetBucketEncryption | |
| GetBucketIntelligentTieringConfiguration | |
| GetBucketInventoryConfiguration | |
| GetBucketLogging | |
| GetBucketMetricsConfiguration | |
| GetBucketNotificationConfiguration | |
| GetBucketOwnershipControls | |
| GetBucketPolicy | |
| GetBucketPolicyStatus | |
| GetBucketReplication | |
| GetBucketRequestPayment | |
| GetBucketTagging | |
| GetObjectTagging | |
| GetObjectTorrent | |
| GetPublicAccessBlock | |
| ListBucketAnalyticsConfigurations | |
| ListBucketIntelligentTieringConfigurations | |
| ListBucketInventoryConfigurations | |
| ListBucketMetricsConfigurations | |
| PutBucketAccelerateConfiguration | |
| PutBucketAnalyticsConfiguration | |
| PutBucketEncryption | |
| PutBucketIntelligentTieringConfiguration | |
| PutBucketInventoryConfiguration | |
| PutBucketLogging | |
| PutBucketMetricsConfiguration | |
| PutBucketNotificationConfiguration | |
| PutBucketOwnershipControls | |
| PutBucketPolicy | |
| PutBucketReplication | |
| PutBucketRequestPayment | |
| PutBucketTagging | |
| PutObjectTagging | |
| PutPublicAccessBlock | |
| RestoreObject | |
| SelectObjectContent |
Load Balancing Data (planned for version 0.2)
This is being yet improved in release 0.5. The working document has not been updated yet, it still only applies to Garage 0.2 through 0.4.
I have conducted a quick study of different methods to load-balance data over different Garage nodes using consistent hashing.
Requirements
-
good balancing: two nodes that have the same announced capacity should receive close to the same number of items
-
multi-datacenter: the replicas of a partition should be distributed over as many datacenters as possible
-
minimal disruption: when adding or removing a node, as few partitions as possible should have to move around
-
order-agnostic: the same set of nodes (each associated with a datacenter name and a capacity) should always return the same distribution of partition replicas, independently of the order in which nodes were added/removed (this is to keep the implementation simple)
Methods
Naive multi-DC ring walking strategy
This strategy can be used with any ring-like algorithm to make it aware of the multi-datacenter requirement:
In this method, the ring is a list of positions, each associated with a single node in the cluster. Partitions contain all the keys between two consecutive items of the ring. To find the nodes that store replicas of a given partition:
- select the node for the position of the partition's lower bound
- go clockwise on the ring, skipping nodes that:
- we halve already selected
- are in a datacenter of a node we have selected, except if we already have nodes from all possible datacenters
In this way the selected nodes will always be distributed over
min(n_datacenters, n_replicas) different datacenters, which is the best we
can do.
This method was implemented in the first version of Garage, with the basic
ring construction from Dynamo DB that consists in associating n_token random positions to
each node (I know it's not optimal, the Dynamo paper already studies this).
Better rings
The ring construction that selects n_token random positions for each nodes gives a ring of positions that
is not well-balanced: the space between the tokens varies a lot, and some partitions are thus bigger than others.
This problem was demonstrated in the original Dynamo DB paper.
To solve this, we want to apply a better second method for partitionning our dataset:
-
fix an initially large number of partitions (say 1024) with evenly-spaced delimiters,
-
attribute each partition randomly to a node, with a probability proportionnal to its capacity (which
n_tokensrepresented in the first method)
For now we continue using the multi-DC ring walking described above.
I have studied two ways to do the attribution of partitions to nodes, in a way that is deterministic:
- Min-hash: for each partition, select node that minimizes
hash(node, partition_number) - MagLev: see here
MagLev provided significantly better balancing, as it guarantees that the exact same number of partitions is attributed to all nodes that have the same capacity (and that this number is proportionnal to the node's capacity, except for large values), however in both cases:
-
the distribution is still bad, because we use the naive multi-DC ring walking that behaves strangely due to interactions between consecutive positions on the ring
-
the disruption in case of adding/removing a node is not as low as it can be, as we show with the following method.
A quick description of MagLev (backend = node, lookup table = ring):
The basic idea of Maglev hashing is to assign a preference list of all the lookup table positions to each backend. Then all the backends take turns filling their most-preferred table positions that are still empty, until the lookup table is completely filled in. Hence, Maglev hashing gives an almost equal share of the lookup table to each of the backends. Heterogeneous backend weights can be achieved by altering the relative frequency of the backends’ turns…
Here are some stats (run scripts/simulate_ring.py to reproduce):
##### Custom-ring (min-hash) #####

#partitions per node (capacity in parenthesis):
- datura (8) :  227
- digitale (8) :  351
- drosera (8) :  259
- geant (16) :  476
- gipsie (16) :  410
- io (16) :  495
- isou (8) :  231
- mini (4) :  149
- mixi (4) :  188
- modi (4) :  127
- moxi (4) :  159

Variance of load distribution for load normalized to intra-class mean
(a class being the set of nodes with the same announced capacity): 2.18%     <-- REALLY BAD

Disruption when removing nodes (partitions moved on 0/1/2/3 nodes):
removing atuin digitale : 63.09% 30.18% 6.64% 0.10%
removing atuin drosera : 72.36% 23.44% 4.10% 0.10%
removing atuin datura : 73.24% 21.48% 5.18% 0.10%
removing jupiter io : 48.34% 38.48% 12.30% 0.88%
removing jupiter isou : 74.12% 19.73% 6.05% 0.10%
removing grog mini : 84.47% 12.40% 2.93% 0.20%
removing grog mixi : 80.76% 16.60% 2.64% 0.00%
removing grog moxi : 83.59% 14.06% 2.34% 0.00%
removing grog modi : 87.01% 11.43% 1.46% 0.10%
removing grisou geant : 48.24% 37.40% 13.67% 0.68%
removing grisou gipsie : 53.03% 33.59% 13.09% 0.29%
on average:  69.84% 23.53% 6.40% 0.23%                  <-- COULD BE BETTER

--------

##### MagLev #####

#partitions per node:
- datura (8) :  273
- digitale (8) :  256
- drosera (8) :  267
- geant (16) :  452
- gipsie (16) :  427
- io (16) :  483
- isou (8) :  272
- mini (4) :  184
- mixi (4) :  160
- modi (4) :  144
- moxi (4) :  154

Variance of load distribution: 0.37%                <-- Already much better, but not optimal

Disruption when removing nodes (partitions moved on 0/1/2/3 nodes):
removing atuin digitale : 62.60% 29.20% 7.91% 0.29%
removing atuin drosera : 65.92% 26.56% 7.23% 0.29%
removing atuin datura : 63.96% 27.83% 7.71% 0.49%
removing jupiter io : 44.63% 40.33% 14.06% 0.98%
removing jupiter isou : 63.38% 27.25% 8.98% 0.39%
removing grog mini : 72.46% 21.00% 6.35% 0.20%
removing grog mixi : 72.95% 22.46% 4.39% 0.20%
removing grog moxi : 74.22% 20.61% 4.98% 0.20%
removing grog modi : 75.98% 18.36% 5.27% 0.39%
removing grisou geant : 46.97% 36.62% 15.04% 1.37%
removing grisou gipsie : 49.22% 36.52% 12.79% 1.46%
on average:  62.94% 27.89% 8.61% 0.57%                  <-- WORSE THAN PREVIOUSLY
The magical solution: multi-DC aware MagLev
Suppose we want to select three replicas for each partition (this is what we do in our simulation and in most Garage deployments). We apply MagLev three times consecutively, one for each replica selection. The first time is pretty much the same as normal MagLev, but for the following times, when a node runs through its preference list to select a partition to replicate, we skip partitions for which adding this node would not bring datacenter-diversity. More precisely, we skip a partition in the preference list if:
- the node already replicates the partition (from one of the previous rounds of MagLev)
- the node is in a datacenter where a node already replicates the partition and there are other datacenters available
Refer to method4 in the simulation script for a formal definition.
##### Multi-DC aware MagLev #####

#partitions per node:
- datura (8) :  268                 <-- NODES WITH THE SAME CAPACITY
- digitale (8) :  267                   HAVE THE SAME NUM OF PARTITIONS
- drosera (8) :  267                    (+- 1)
- geant (16) :  470
- gipsie (16) :  472
- io (16) :  516
- isou (8) :  268
- mini (4) :  136
- mixi (4) :  136
- modi (4) :  136
- moxi (4) :  136

Variance of load distribution: 0.06%                <-- CAN'T DO BETTER THAN THIS

Disruption when removing nodes (partitions moved on 0/1/2/3 nodes):
removing atuin digitale : 65.72% 33.01% 1.27% 0.00%
removing atuin drosera : 64.65% 33.89% 1.37% 0.10%
removing atuin datura : 66.11% 32.62% 1.27% 0.00%
removing jupiter io : 42.97% 53.42% 3.61% 0.00%
removing jupiter isou : 66.11% 32.32% 1.56% 0.00%
removing grog mini : 80.47% 18.85% 0.68% 0.00%
removing grog mixi : 80.27% 18.85% 0.88% 0.00%
removing grog moxi : 80.18% 19.04% 0.78% 0.00%
removing grog modi : 79.69% 19.92% 0.39% 0.00%
removing grisou geant : 44.63% 52.15% 3.22% 0.00%
removing grisou gipsie : 43.55% 52.54% 3.91% 0.00%
on average:  64.94% 33.33% 1.72% 0.01%                  <-- VERY GOOD (VERY LOW VALUES FOR 2 AND 3 NODES)
Migrating from 0.5 to 0.6
This guide explains how to migrate to 0.6 if you have an existing 0.5 cluster. We don't recommend trying to migrate directly from 0.4 or older to 0.6.
We make no guarantee that this migration will work perfectly: back up all your data before attempting it!
Garage v0.6 (not yet released) introduces a new data model for buckets, that allows buckets to have many names (aliases). Buckets can also have "private" aliases (called local aliases), which are only visible when using a certain access key.
This new data model means that the metadata tables have changed quite a bit in structure, and a manual migration step is required.
The migration steps are as follows:
-
Disable api and web access for some time (Garage does not support disabling these endpoints but you can change the port number or stop your reverse proxy for instance).
-
Do
garage repair -a --yes tablesandgarage repair -a --yes blocks, check the logs and check that all data seems to be synced correctly between nodes. -
Turn off Garage 0.5
-
Backup your metadata folders!!
-
Turn on Garage 0.6
-
At this point,
garage bucket listshould indicate that no buckets are present in the cluster.garage key listshould show all of the previously existing access key, however these keys should not have any permissions to access buckets. -
Run
garage migrate buckets050: this will populate the new bucket table with the buckets that existed previously. This will also give access to API keys as it was before. -
Do
garage repair -a --yes tablesandgarage repair -a --yes blocks, check the logs and check that all data seems to be synced correctly between nodes. -
Check that all your buckets indeed appear in
garage bucket list, and that keys have the proper access flags set. If that is not the case, revert everything and file a bug! -
Your upgraded cluster should be in a working state. Re-enable API and Web access and check that everything went well.
Migrating from 0.3 to 0.4
Migrating from 0.3 to 0.4 is unsupported. This document is only intended to document the process internally for the Deuxfleurs cluster where we have to do it. Do not try it yourself, you will lose your data and we will not help you.
Migrating from 0.2 to 0.4 will break everything for sure. Never try it.
The internal data format of Garage hasn't changed much between 0.3 and 0.4. The Sled database is still the same, and the data directory as well.
The following has changed, all in the meta directory:
-
node_idin 0.3 contains the identifier of the current node. In 0.4, this file does nothing and should be deleted. It is replaced bynode_key(the secret key) andnode_key.pub(the associated public key). A node's identifier on the ring is its public key. -
peer_infoin 0.3 contains the list of peers saved automatically by Garage. The format has changed and it is now stored inpeer_list(peer_infoshould be deleted).
When migrating, all node identifiers will change. This also means that the affectation of data partitions on the ring will change, and lots of data will have to be rebalanced.
-
If your cluster has only 3 nodes, all nodes store everything, therefore nothing has to be rebalanced.
-
If your cluster has only 4 nodes, for any partition there will always be at least 2 nodes that stored data before that still store it after. Therefore the migration should in theory be transparent and Garage should continue to work during the rebalance.
-
If your cluster has 5 or more nodes, data will disappear during the migration. Do not migrate (fortunately we don't have this scenario at Deuxfleurs), or if you do, make Garage unavailable until things stabilize (disable web and api access).
The migration steps are as follows:
- Prepare a new configuration file for 0.4. For each node, point to the same meta and data directories as Garage 0.3. Basically, the things that change are the following:
- No more
rpc_tlssection - You have to generate a shared
rpc_secretand put it in all config files bootstrap_peershas a different syntax as it has to contain node keys. Leave it empty and usegarage node-idandgarage node connectinstead (new features of 0.4)- put the publicly accessible RPC address of your node in
rpc_public_addrif possible (its optional but recommended) - If you are using Consul, change the
consul_service_nameto NOT be the name advertised by Nomad. Now Garage is responsible for advertising its own service itself.
-
Disable api and web access for some time (Garage does not support disabling these endpoints but you can change the port number or stop your reverse proxy for instance).
-
Do
garage repair -a --yes tablesandgarage repair -a --yes blocks, check the logs and check that all data seems to be synced correctly between nodes. -
Save somewhere the output of
garage status. We will need this to remember how to reconfigure nodes in 0.4. -
Turn off Garage 0.3
-
Backup metadata folders if you can (i.e. if you have space to do it somewhere). Backuping data folders could also be usefull but that's much harder to do. If your filesystem supports snapshots, this could be a good time to use them.
-
Turn on Garage 0.4
-
At this point, running
garage statusshould indicate that all nodes of the previous cluster are "unavailable". The nodes have new identifiers that should appear in healthy nodes once they can talk to one another (usegarage node connectif necessary`). They should have NO ROLE ASSIGNED at the moment. -
Prepare a script with several
garage node configurecommands that replace each of the v0.3 node ID with the corresponding v0.4 node ID, with the same zone/tag/capacity. For example if your nodedroserahad identifierc24ebefore and now has identifier789a, and it was configured with capacity2in zonedc1, put the following command in your script:
garage node configure 789a -z dc1 -c 2 -t drosera --replace c24e
-
Run your reconfiguration script. Check that the new output of
garage statuscontains the correct node IDs with the correct values for capacity and zone. Old nodes should no longer be mentioned. -
If your cluster has 4 nodes or less, and you are feeling adventurous, you can reenable Web and API access now. Things will probably work.
-
Garage might already be resyncing stuff. Issue a
garage repair -a --yes tablesandgarage repair -a --yes blocksto force it to do so. -
Wait for resyncing activity to stop in the logs. Do steps 12 and 13 two or three times, until you see that when you issue the repair commands, nothing gets resynced any longer.
-
Your upgraded cluster should be in a working state. Re-enable API and Web access and check that everything went well.
Design draft
WARNING: this documentation is a design draft which was written before Garage's actual implementation. The general principle are similar, but details have not been updated.
Modules
membership/: configuration, membership management (gossip of node's presence and status), ring generation --> what about Serf (used by Consul/Nomad) : https://www.serf.io/? Seems a huge library with many features so maybe overkill/hard to integratemetadata/: metadata managementblocks/: block management, writing, GC and rebalancinginternal/: server to server communication (HTTP server and client that reuses connections, TLS if we want, etc)api/: S3 APIweb/: web management interface
Metadata tables
Objects:
- Hash key: Bucket name (string)
- Sort key: Object key (string)
- Sort key: Version timestamp (int)
- Sort key: Version UUID (string)
- Complete: bool
- Inline: bool, true for objects < threshold (say 1024)
- Object size (int)
- Mime type (string)
- Data for inlined objects (blob)
- Hash of first block otherwise (string)
Having only a hash key on the bucket name will lead to storing all file entries of this table for a specific bucket on a single node. At the same time, it is the only way I see to rapidly being able to list all bucket entries...
Blocks:
- Hash key: Version UUID (string)
- Sort key: Offset of block in total file (int)
- Hash of data block (string)
A version is defined by the existence of at least one entry in the blocks table for a certain version UUID. We must keep the following invariant: if a version exists in the blocks table, it has to be referenced in the objects table. We explicitly manage concurrent versions of an object: the version timestamp and version UUID columns are index columns, thus we may have several concurrent versions of an object. Important: before deleting an older version from the objects table, we must make sure that we did a successfull delete of the blocks of that version from the blocks table.
Thus, the workflow for reading an object is as follows:
- Check permissions (LDAP)
- Read entry in object table. If data is inline, we have its data, stop here. -> if several versions, take newest one and launch deletion of old ones in background
- Read first block from cluster. If size <= 1 block, stop here.
- Simultaneously with previous step, if size > 1 block: query the Blocks table for the IDs of the next blocks
- Read subsequent blocks from cluster
Workflow for PUT:
- Check write permission (LDAP)
- Select a new version UUID
- Write a preliminary entry for the new version in the objects table with complete = false
- Send blocks to cluster and write entries in the blocks table
- Update the version with complete = true and all of the accurate information (size, etc)
- Return success to the user
- Launch a background job to check and delete older versions
Workflow for DELETE:
- Check write permission (LDAP)
- Get current version (or versions) in object table
- Do the deletion of those versions NOT IN A BACKGROUND JOB THIS TIME
- Return succes to the user if we were able to delete blocks from the blocks table and entries from the object table
To delete a version:
- List the blocks from Cassandra
- For each block, delete it from cluster. Don't care if some deletions fail, we can do GC.
- Delete all of the blocks from the blocks table
- Finally, delete the version from the objects table
Known issue: if someone is reading from a version that we want to delete and the object is big, the read might be interrupted. I think it is ok to leave it like this, we just cut the connection if data disappears during a read.
("Soit P un problème, on s'en fout est une solution à ce problème")
Block storage on disk
Blocks themselves:
- file path = /blobs/(first 3 hex digits of hash)/(rest of hash)
Reverse index for GC & other block-level metadata:
- file path = /meta/(first 3 hex digits of hash)/(rest of hash)
- map block hash -> set of version UUIDs where it is referenced
Usefull metadata:
- list of versions that reference this block in the Casandra table, so that we can do GC by checking in Cassandra that the lines still exist
- list of other nodes that we know have acknowledged a write of this block, usefull in the rebalancing algorithm
Write strategy: have a single thread that does all write IO so that it is serialized (or have several threads that manage independent parts of the hash space). When writing a blob, write it to a temporary file, close, then rename so that a concurrent read gets a consistent result (either not found or found with whole content).
Read strategy: the only read operation is get(hash) that returns either the data or not found (can do a corruption check as well and return corrupted state if it is the case). Can be done concurrently with writes.
Internal API:
- get(block hash) -> ok+data/not found/corrupted
- put(block hash & data, version uuid + offset) -> ok/error
- put with no data(block hash, version uuid + offset) -> ok/not found plz send data/error
- delete(block hash, version uuid + offset) -> ok/error
GC: when last ref is deleted, delete block. Long GC procedure: check in Cassandra that version UUIDs still exist and references this block.
Rebalancing: takes as argument the list of newly added nodes.
- List all blocks that we have. For each block:
- If it hits a newly introduced node, send it to them. Use put with no data first to check if it has to be sent to them already or not. Use a random listing order to avoid race conditions (they do no harm but we might have two nodes sending the same thing at the same time thus wasting time).
- If it doesn't hit us anymore, delete it and its reference list.
Only one balancing can be running at a same time. It can be restarted at the beginning with new parameters.
Membership management
Two sets of nodes:
- set of nodes from which a ping was recently received, with status: number of stored blocks, request counters, error counters, GC%, rebalancing% (eviction from this set after say 30 seconds without ping)
- set of nodes that are part of the system, explicitly modified by the operator using the web UI (persisted to disk), is a CRDT using a version number for the value of the whole set
Thus, three states for nodes:
- healthy: in both sets
- missing: not pingable but part of desired cluster
- unused/draining: currently present but not part of the desired cluster, empty = if contains nothing, draining = if still contains some blocks
Membership messages between nodes:
- ping with current state + hash of current membership info -> reply with same info
- send&get back membership info (the ids of nodes that are in the two sets): used when no local membership change in a long time and membership info hash discrepancy detected with first message (passive membership fixing with full CRDT gossip)
- inform of newly pingable node(s) -> no result, when receive new info repeat to all (reliable broadcast)
- inform of operator membership change -> no result, when receive new info repeat to all (reliable broadcast)
Ring: generated from the desired set of nodes, however when doing read/writes on the ring, skip nodes that are known to be not pingable. The tokens are generated in a deterministic fashion from node IDs (hash of node id + token number from 1 to K). Number K of tokens per node: decided by the operator & stored in the operator's list of nodes CRDT. Default value proposal: with node status information also broadcast disk total size and free space, and propose a default number of tokens equal to 80%Free space / 10Gb. (this is all user interface)
Constants
- Block size: around 1MB ? --> Exoscale use 16MB chunks
- Number of tokens in the hash ring: one every 10Gb of allocated storage
- Threshold for storing data directly in Cassandra objects table: 1kb bytes (maybe up to 4kb?)
- Ping timeout (time after which a node is registered as unresponsive/missing): 30 seconds
- Ping interval: 10 seconds
- ??